> ## Documentation Index
> Fetch the complete documentation index at: https://docs.agntix.ai/llms.txt
> Use this file to discover all available pages before exploring further.
# Voice calls
> Turn any Agntix agent into a voice agent — test from your browser, then place outbound or accept inbound PSTN calls.
Voice support layers on top of any Agntix agent. Flip the **Voice Enabled** toggle, pick TTS/STT providers, and you can talk to the agent from your browser (LiveKit) or attach a phone number for PSTN inbound/outbound calls (Twilio, Telnyx, or BYON).
## Prerequisites
* A signed-in dashboard account at [app.agntix.ai](https://app.agntix.ai).
* An existing agent (see [Build your first agent](/guides/build-your-first-agent)).
* For PSTN calling: at least one phone number imported on the [Phone Numbers](https://app.agntix.ai/phone-numbers) page. Twilio/Telnyx are supported out of the box; you can also import a custom (BYON) SIP trunk.
## Step 1: Enable voice on the agent
Open your agent at `/agents/{id}`. In the top-right of the General Settings card, flip **Voice Enabled** on.
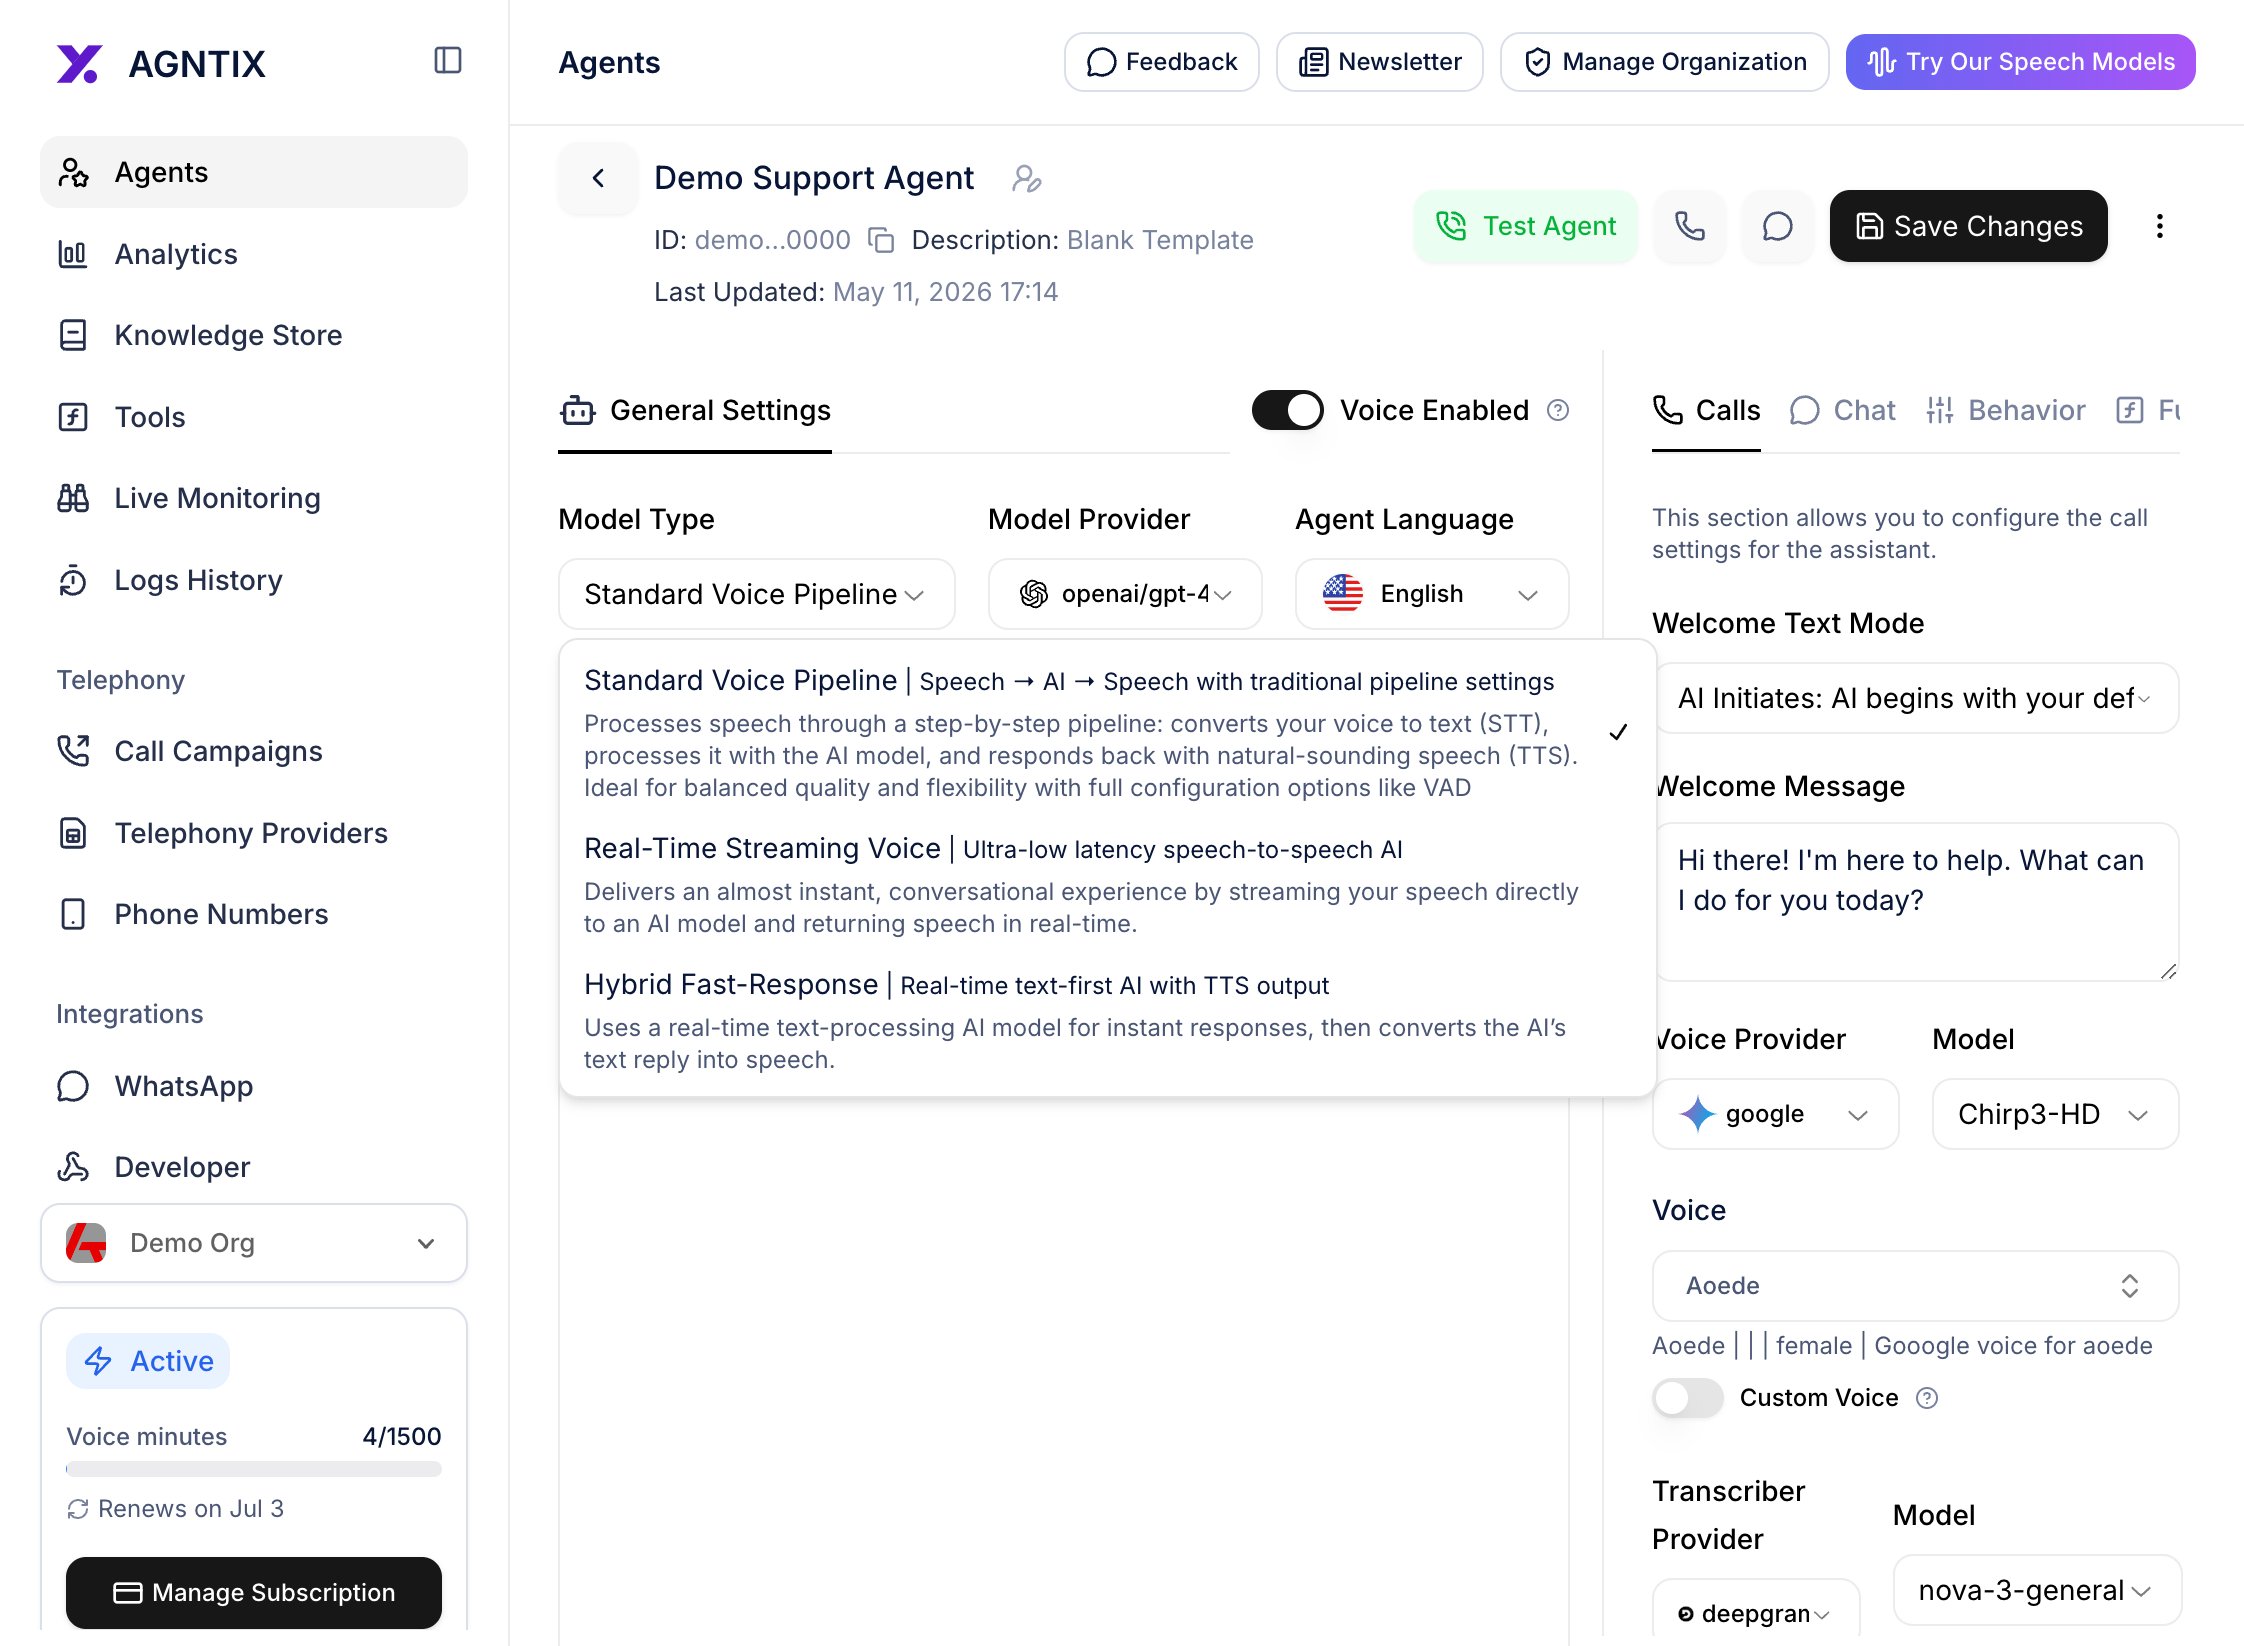
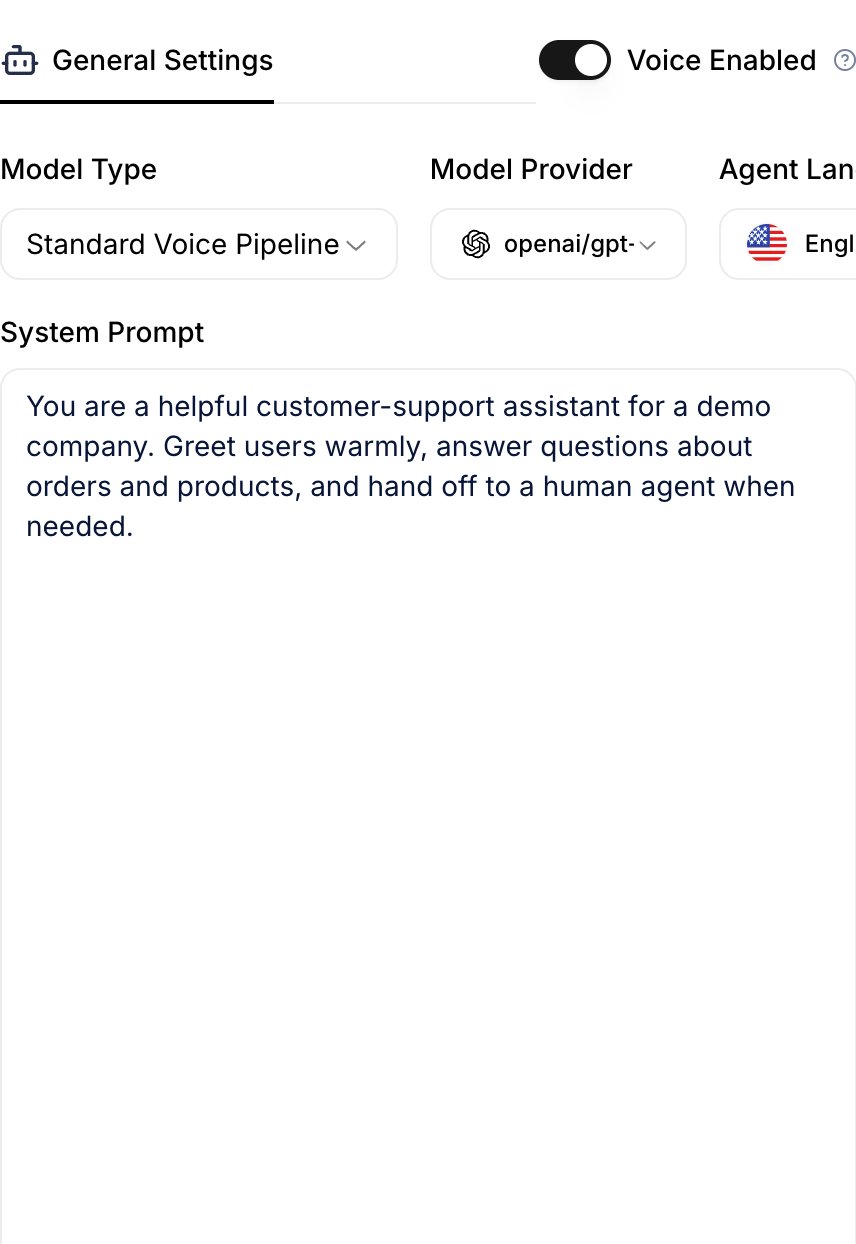 Once enabled, a **Model Type** selector appears with two options:
* **Pipeline (STT → LLM → TTS)** — three separate models. Best quality and most flexibility; slightly higher latency.
* **Speech-to-Speech (STS)** — a single multimodal model (e.g. OpenAI Realtime, Gemini Live) handles audio in *and* out. Lowest latency; fewer provider choices.
For most use cases pick **Pipeline**.
Once enabled, a **Model Type** selector appears with two options:
* **Pipeline (STT → LLM → TTS)** — three separate models. Best quality and most flexibility; slightly higher latency.
* **Speech-to-Speech (STS)** — a single multimodal model (e.g. OpenAI Realtime, Gemini Live) handles audio in *and* out. Lowest latency; fewer provider choices.
For most use cases pick **Pipeline**.
 ## Step 2: Configure TTS and STT
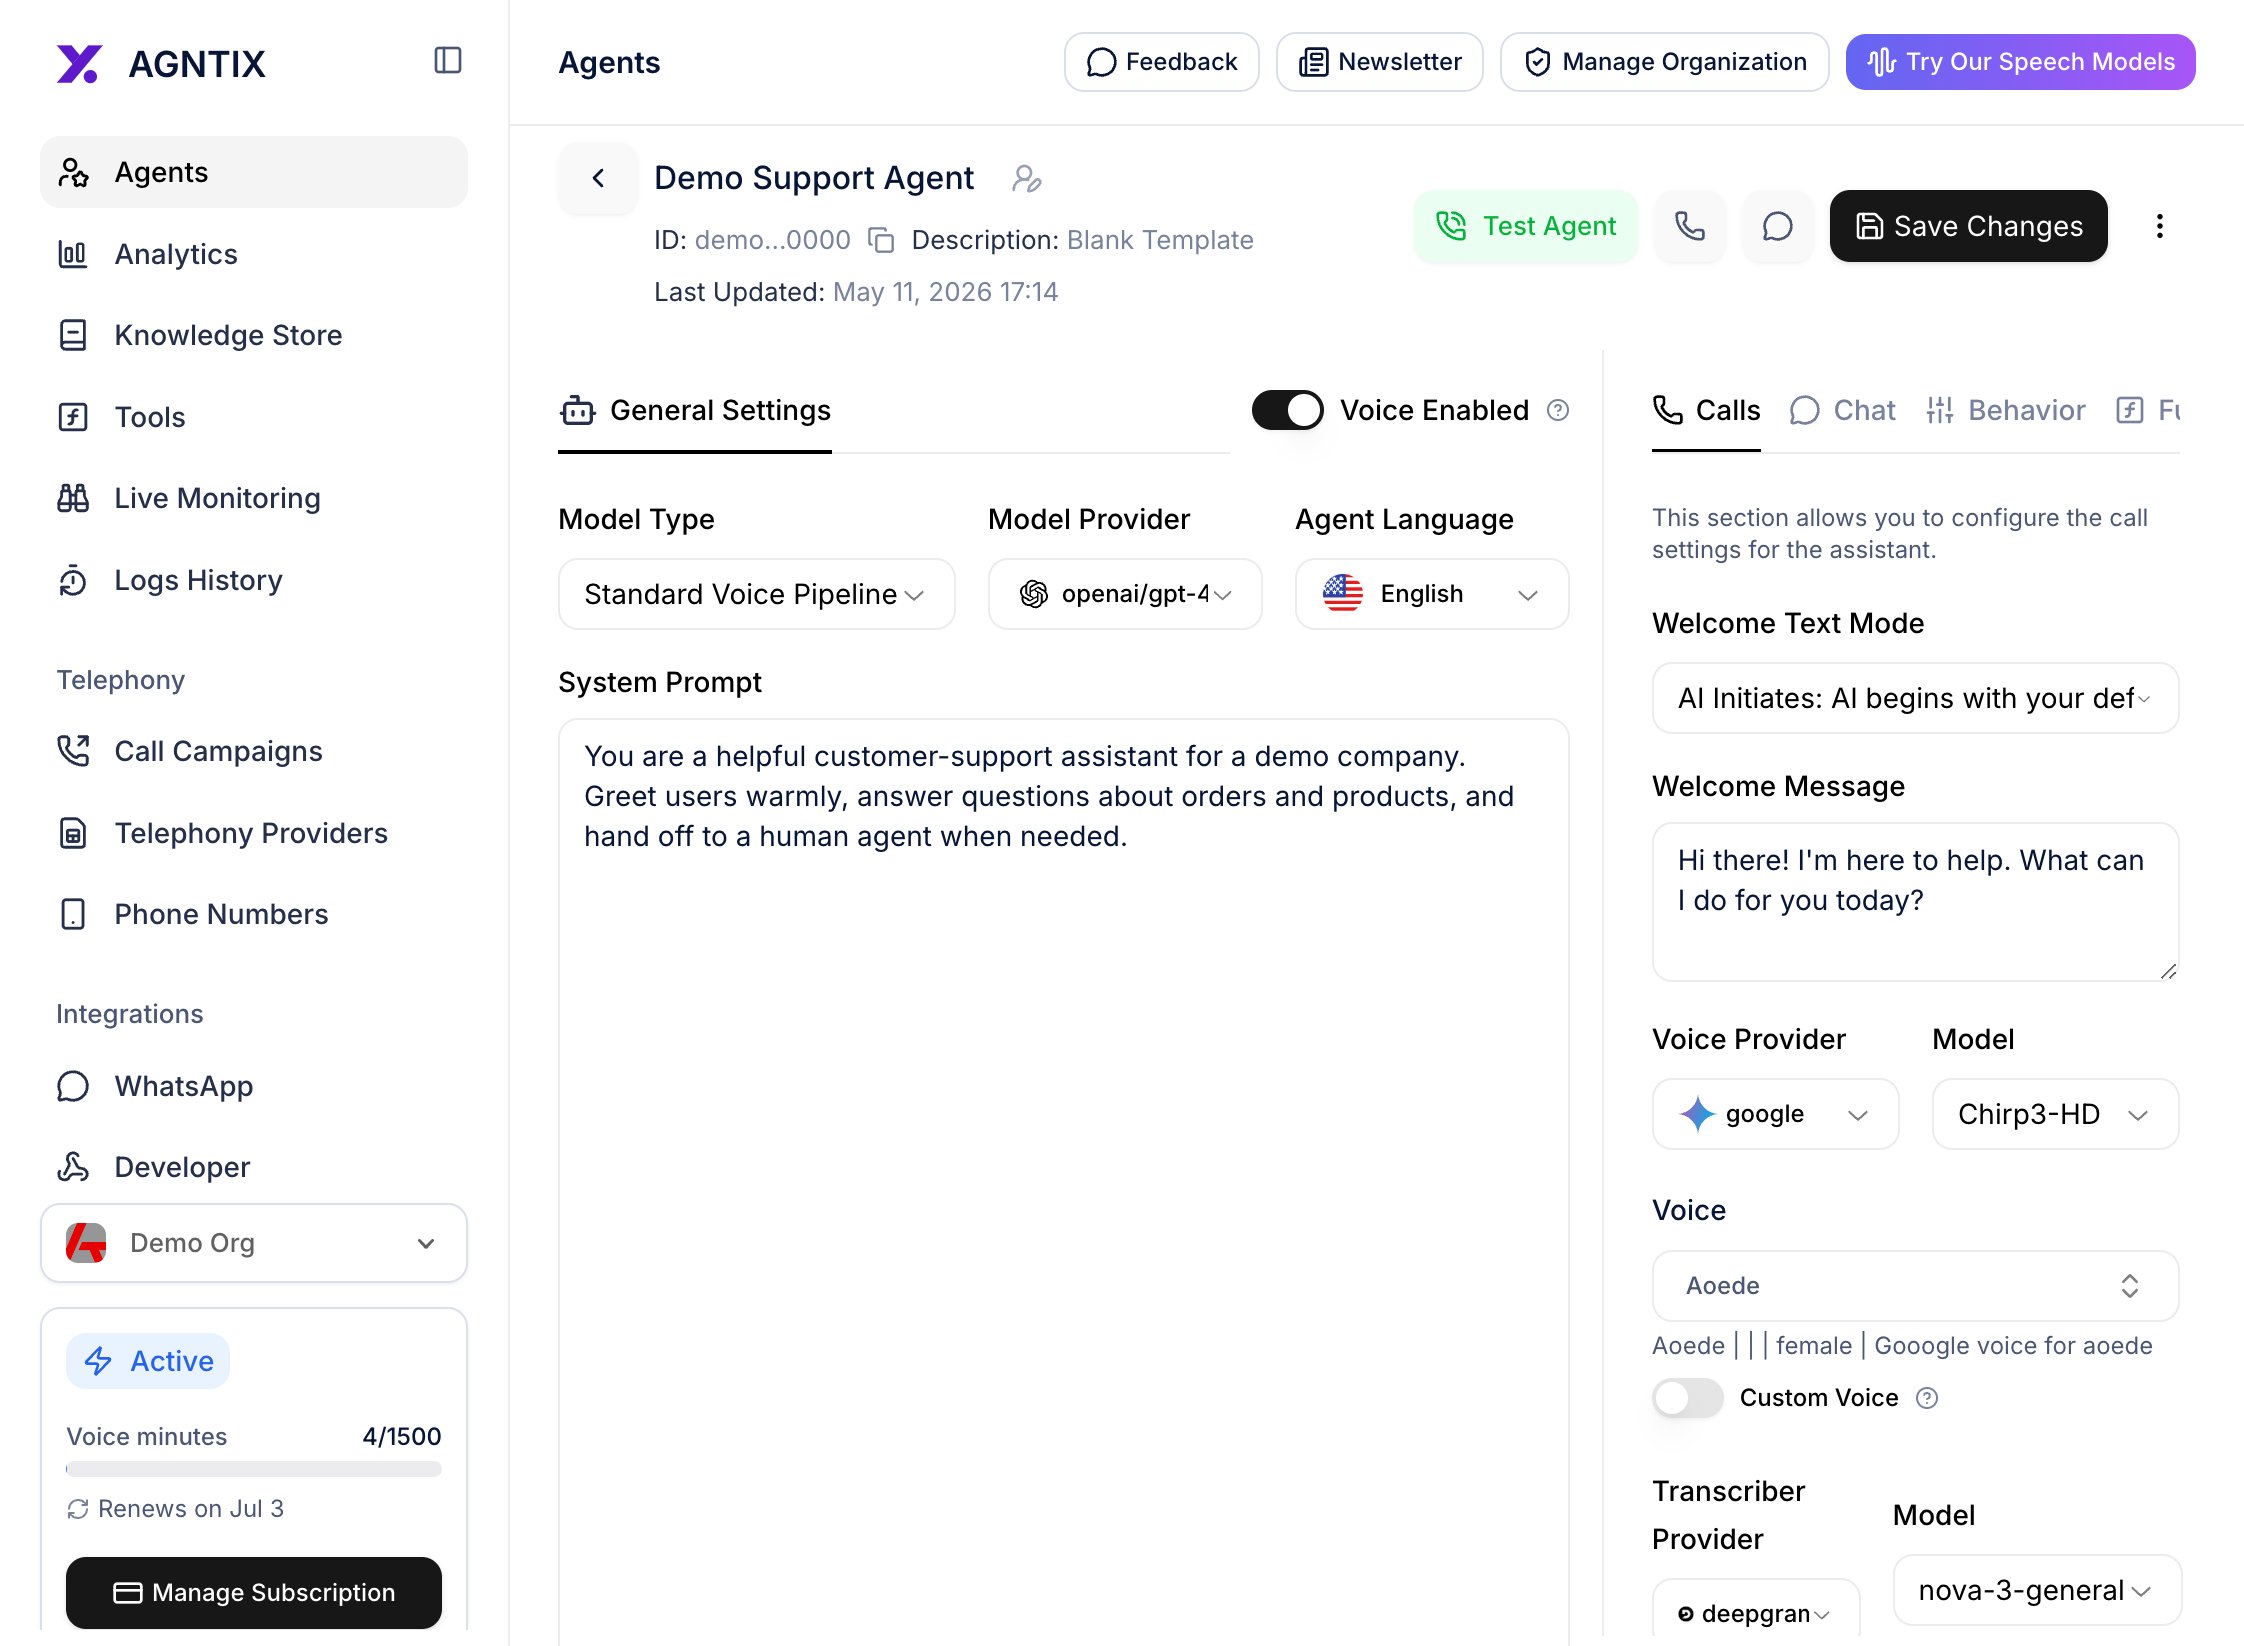
Switch to the **Calls** tab on the right side of the agent page. You'll see the voice-pipeline configuration:
* **TTS Provider** — ElevenLabs, Google, OpenAI, Cartesia, Deepgram Aura, and others (depending on what your org has access to).
* **TTS Model** — model variants offered by the provider.
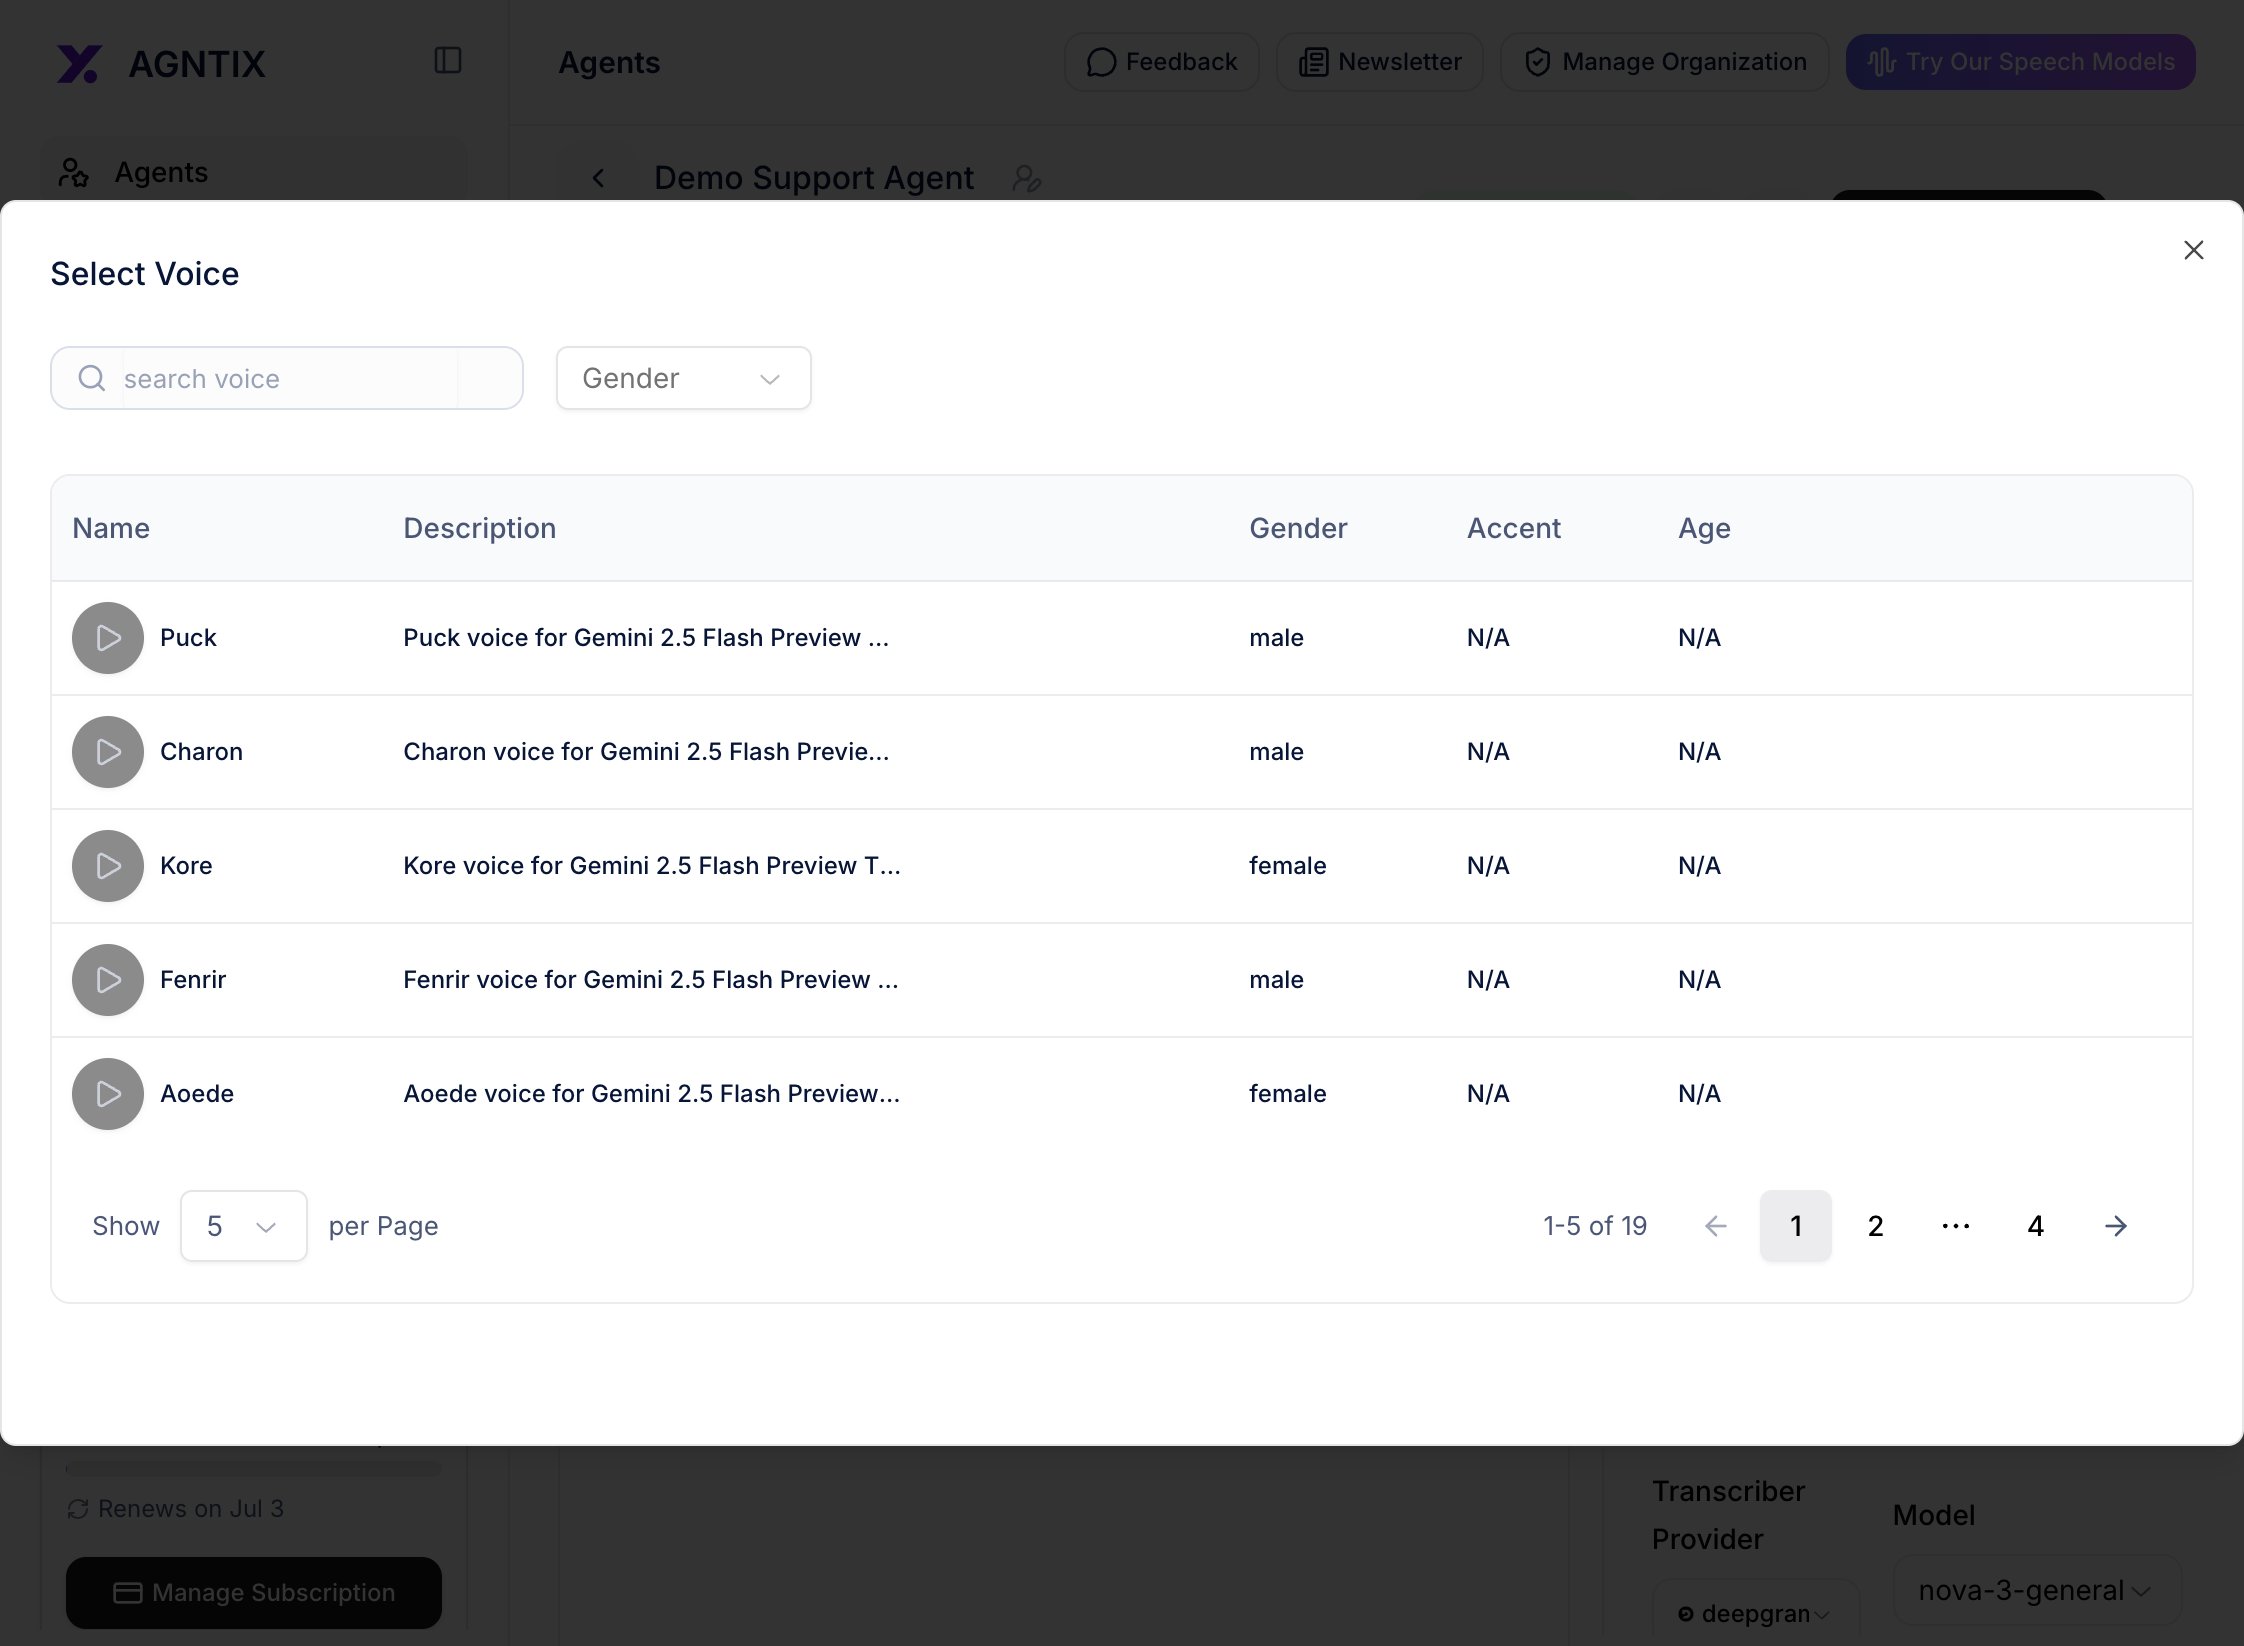
* **Voice** — the specific voice (preview each by clicking its play icon).
* **STT Provider** — Deepgram, OpenAI, Google, Azure, etc.
* **STT Model** — provider-specific models (e.g. `nova-3-general` for Deepgram).
## Step 2: Configure TTS and STT
Switch to the **Calls** tab on the right side of the agent page. You'll see the voice-pipeline configuration:
* **TTS Provider** — ElevenLabs, Google, OpenAI, Cartesia, Deepgram Aura, and others (depending on what your org has access to).
* **TTS Model** — model variants offered by the provider.
* **Voice** — the specific voice (preview each by clicking its play icon).
* **STT Provider** — Deepgram, OpenAI, Google, Azure, etc.
* **STT Model** — provider-specific models (e.g. `nova-3-general` for Deepgram).
 The voice dropdown shows a searchable list, grouped by provider:
 When you're happy, click **Save Changes** in the page header.
## Step 3: Test in the browser
You don't need a phone number to test voice. Click the green **Test Agent** button in the page header. Agntix mints a short-lived LiveKit token, opens a room, and joins the agent automatically.
When you're happy, click **Save Changes** in the page header.
## Step 3: Test in the browser
You don't need a phone number to test voice. Click the green **Test Agent** button in the page header. Agntix mints a short-lived LiveKit token, opens a room, and joins the agent automatically.
 Allow microphone access, say something, and verify:
* The agent responds quickly (sub-second time-to-first-audio is normal).
* TTS sounds right (voice, speed, language match what you configured).
* STT captures your speech accurately (check the **Calls** tab's transcript if available).
If latency feels off, see the [Advanced voice tuning](#advanced-voice-tuning) section at the bottom.
## Step 4: Attach a phone number
To accept real phone calls (inbound) or place them programmatically (outbound), attach a phone number.
1. Open **Phone Numbers** from the left nav.
2. Click **Import** in the top right.
3. Pick a provider (Twilio / Telnyx / BYON), select or paste the E.164 number, and choose which agent handles inbound and outbound traffic.
Allow microphone access, say something, and verify:
* The agent responds quickly (sub-second time-to-first-audio is normal).
* TTS sounds right (voice, speed, language match what you configured).
* STT captures your speech accurately (check the **Calls** tab's transcript if available).
If latency feels off, see the [Advanced voice tuning](#advanced-voice-tuning) section at the bottom.
## Step 4: Attach a phone number
To accept real phone calls (inbound) or place them programmatically (outbound), attach a phone number.
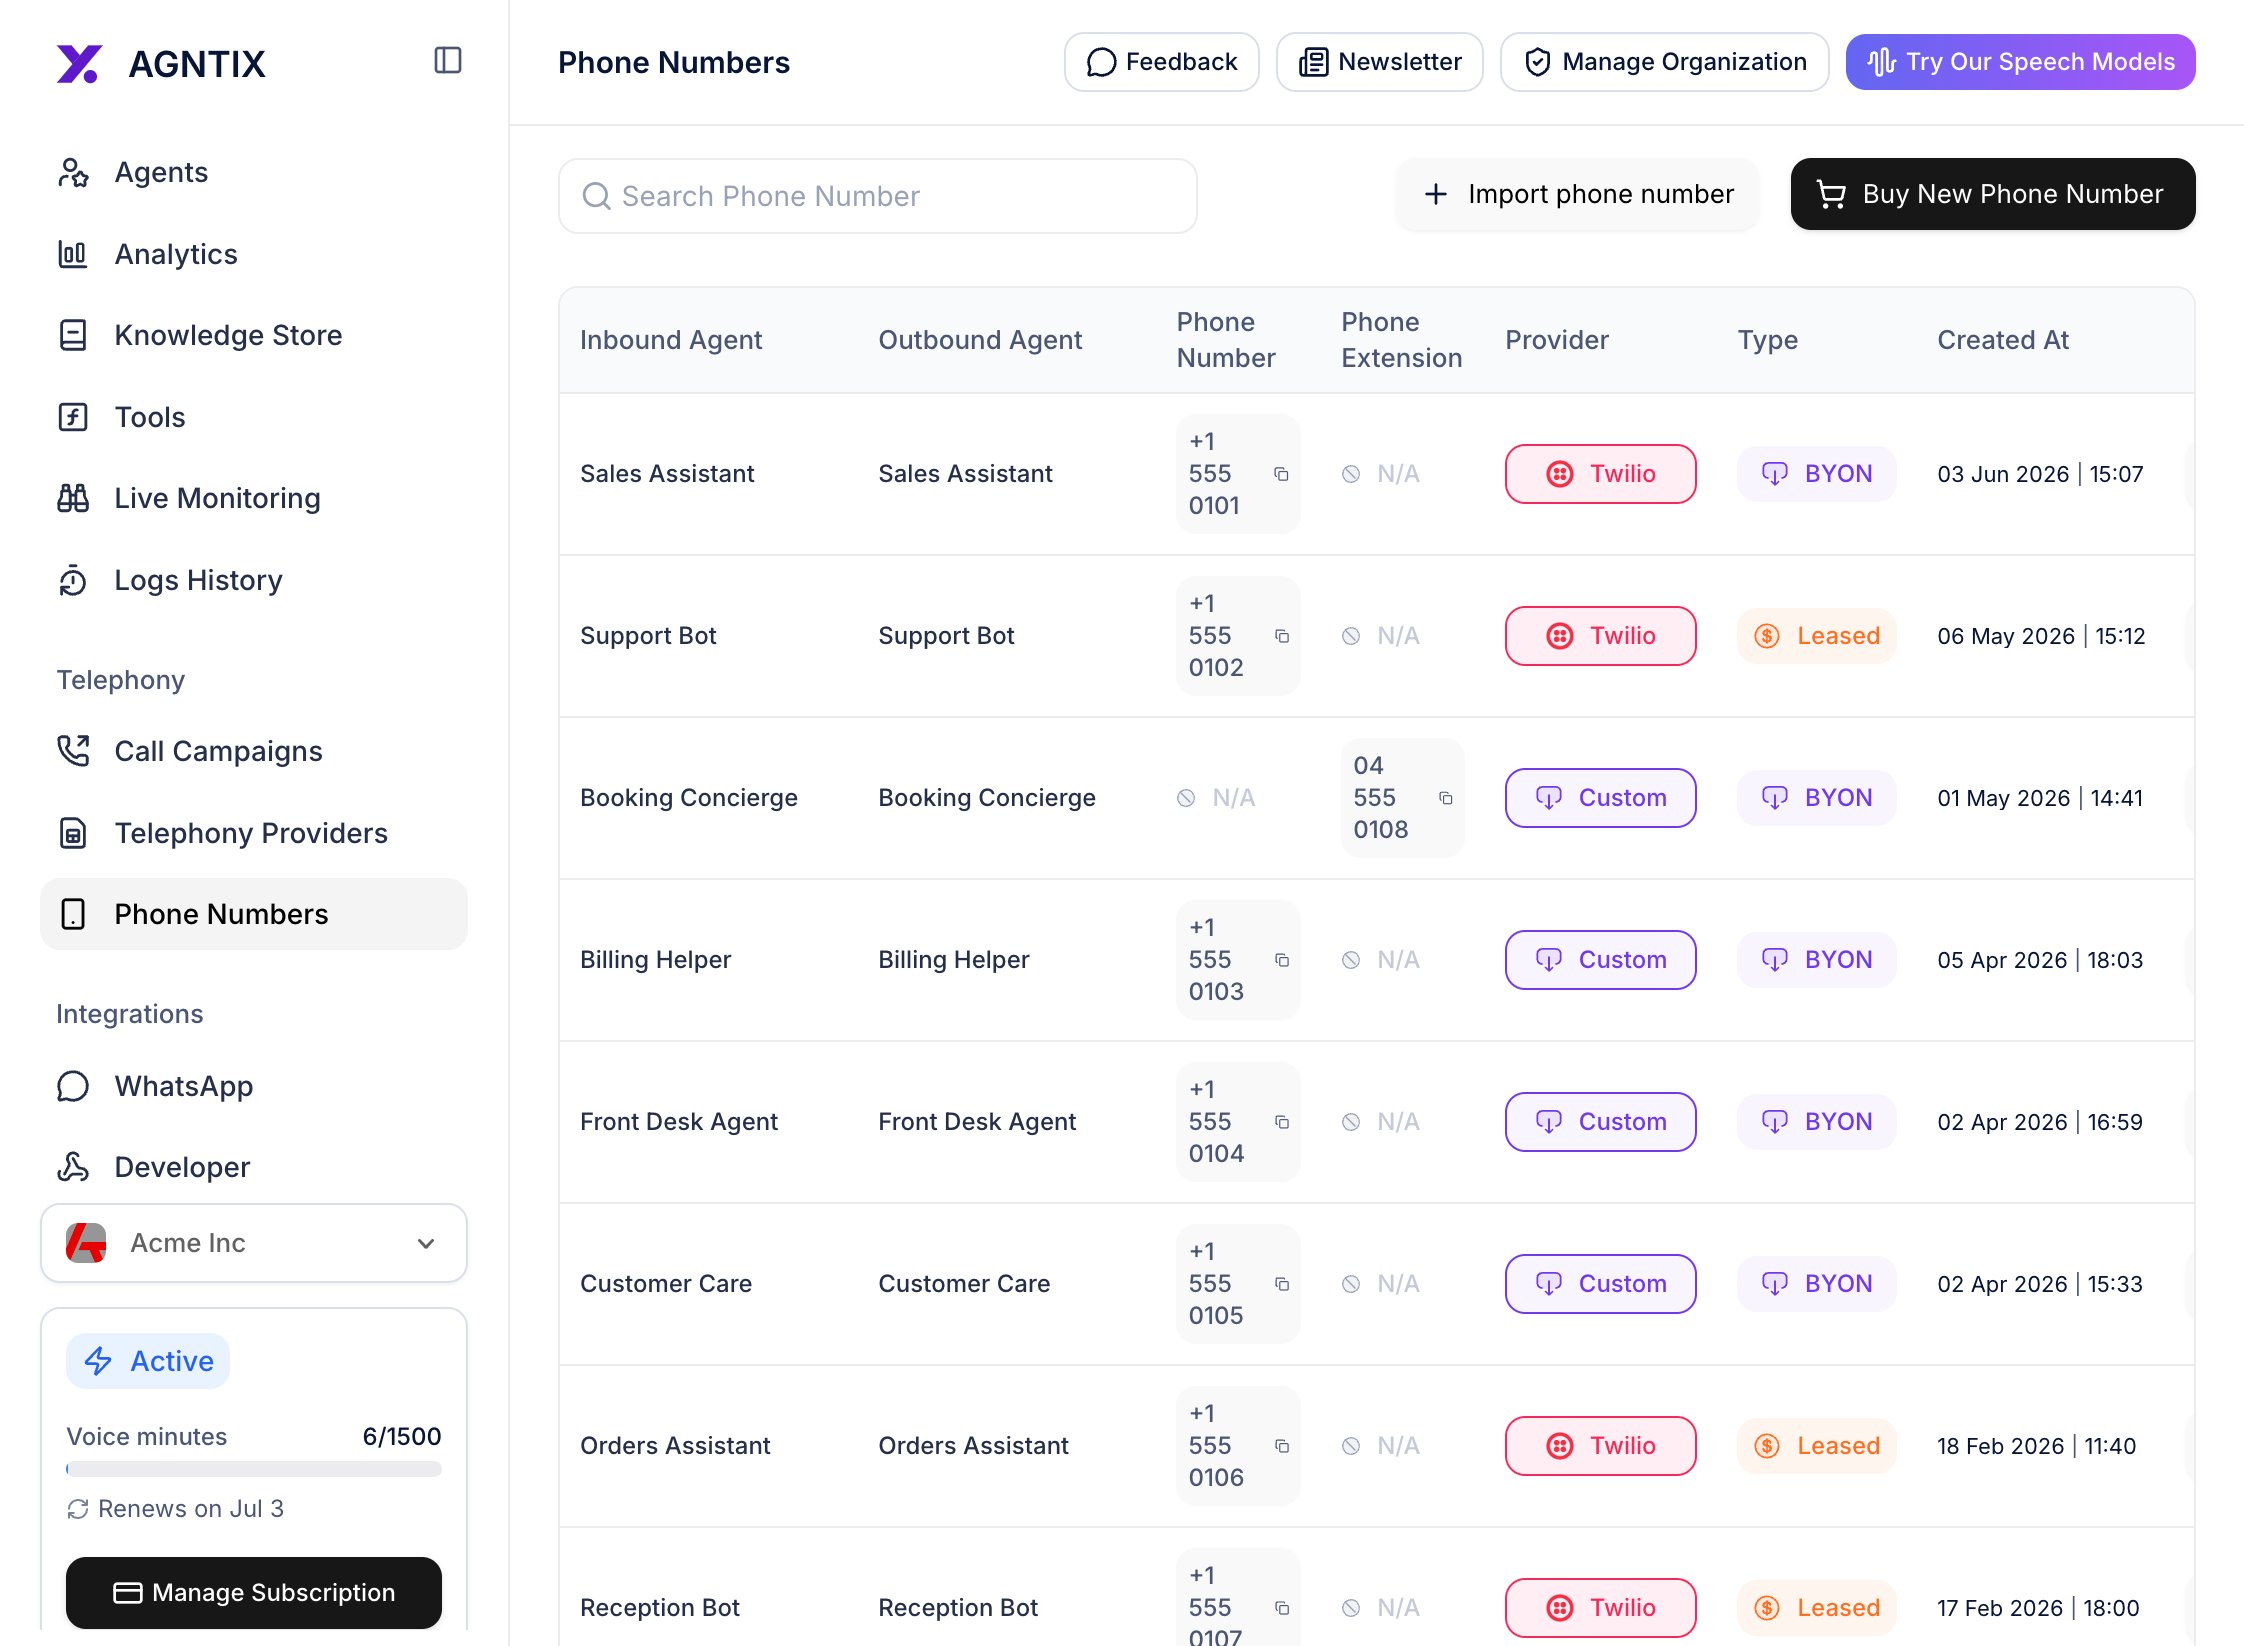
1. Open **Phone Numbers** from the left nav.
2. Click **Import** in the top right.
3. Pick a provider (Twilio / Telnyx / BYON), select or paste the E.164 number, and choose which agent handles inbound and outbound traffic.
 After importing, the row shows the linked agent's name in the **Inbound Agent** / **Outbound Agent** columns. Inbound calls to that number now route to your agent automatically.
 ## Step 5: Place an outbound call
To place a real call out:
1. On the **Phone Numbers** list, click the phone icon on the row whose outbound agent is the one you want to call from. Or open the agent's detail page and click **Initiate Outbound Call** in the header.
2. Enter the destination phone number in E.164 format (e.g. `+14155550123`).
3. Optionally pass **session variables** — key/value pairs available to the system prompt as `{{variableName}}`. Useful for personalizing (e.g. `customerName=Alex`).
4. Click **Call**.
## Step 5: Place an outbound call
To place a real call out:
1. On the **Phone Numbers** list, click the phone icon on the row whose outbound agent is the one you want to call from. Or open the agent's detail page and click **Initiate Outbound Call** in the header.
2. Enter the destination phone number in E.164 format (e.g. `+14155550123`).
3. Optionally pass **session variables** — key/value pairs available to the system prompt as `{{variableName}}`. Useful for personalizing (e.g. `customerName=Alex`).
4. Click **Call**.
 The call shows up under **Logs / History** the moment it connects, with full transcript and call recording once it ends.
## Verify it works
* The **Test Agent** browser session connects without errors and the agent speaks back.
* Inbound calls to the attached phone number ring the agent (not voicemail).
* Outbound calls from the dashboard reach the destination phone.
* Each call appears in **Logs / History** with a transcript and audio.
## Advanced voice tuning
The **Calls** tab also exposes these knobs (collapsed by default — open the *Advanced* section):
| Setting | What it does |
| ----------------------------------------- | -------------------------------------------------------------------------------------------------------- |
| **Allow Interruptions** | If on, the agent stops talking when the user starts speaking (barge-in). |
| **Preemptive Synthesis** | Start TTS before the LLM finishes — cuts perceived latency at the cost of occasional cut-offs. |
| **Welcome Mode** | Whether the agent greets the user immediately, after silence, or only when spoken to first. |
| **Background Noise Config** | Add ambient noise (light office, café) to make the call feel more natural. |
| **End-of-Turn Detection** | Heuristic (silence threshold) or **SmartTurn** (model-based). SmartTurn is better in noisy environments. |
| **Interrupt Speech Duration / Min Words** | How long / how many words the user must speak before the agent yields. |
Tweak one at a time and re-test — these settings significantly affect perceived quality.
## Common next steps
Place outbound calls in bulk against a contact list.
Let the agent end calls, transfer to a human, or invoke your APIs.
Subscribe to per-utterance events from your backend.
Receive `session.updated` and `call.ended` events.
## API alternative
Every dashboard step above maps to a REST endpoint. Minimal scripted version:
```bash theme={null}
curl -X POST https://api.agntix.ai/v1/chat/voice/agents/$AGENT_ID \
-H "x-api-key: $AGNTIX_API_KEY" \
-H "Content-Type: application/json" \
-d '{
"tts": { "provider": "elevenLabs", "voiceId": "..." },
"stt": { "provider": "deepgram", "model": "nova-3-general" }
}'
curl -X POST https://api.agntix.ai/v1/chat/voice/token \
-H "x-api-key: $AGNTIX_API_KEY" \
-H "Content-Type: application/json" \
-d '{ "agentId": "agnt_…", "userId": "browser-anon-id" }'
```
The token in the response is what you hand to the [LiveKit Web SDK](https://docs.livekit.io/reference/client-sdk-js/) to join the room. See the [Voice API reference](/api-reference/voice/overview) for the full schema.
The call shows up under **Logs / History** the moment it connects, with full transcript and call recording once it ends.
## Verify it works
* The **Test Agent** browser session connects without errors and the agent speaks back.
* Inbound calls to the attached phone number ring the agent (not voicemail).
* Outbound calls from the dashboard reach the destination phone.
* Each call appears in **Logs / History** with a transcript and audio.
## Advanced voice tuning
The **Calls** tab also exposes these knobs (collapsed by default — open the *Advanced* section):
| Setting | What it does |
| ----------------------------------------- | -------------------------------------------------------------------------------------------------------- |
| **Allow Interruptions** | If on, the agent stops talking when the user starts speaking (barge-in). |
| **Preemptive Synthesis** | Start TTS before the LLM finishes — cuts perceived latency at the cost of occasional cut-offs. |
| **Welcome Mode** | Whether the agent greets the user immediately, after silence, or only when spoken to first. |
| **Background Noise Config** | Add ambient noise (light office, café) to make the call feel more natural. |
| **End-of-Turn Detection** | Heuristic (silence threshold) or **SmartTurn** (model-based). SmartTurn is better in noisy environments. |
| **Interrupt Speech Duration / Min Words** | How long / how many words the user must speak before the agent yields. |
Tweak one at a time and re-test — these settings significantly affect perceived quality.
## Common next steps
Place outbound calls in bulk against a contact list.
Let the agent end calls, transfer to a human, or invoke your APIs.
Subscribe to per-utterance events from your backend.
Receive `session.updated` and `call.ended` events.
## API alternative
Every dashboard step above maps to a REST endpoint. Minimal scripted version:
```bash theme={null}
curl -X POST https://api.agntix.ai/v1/chat/voice/agents/$AGENT_ID \
-H "x-api-key: $AGNTIX_API_KEY" \
-H "Content-Type: application/json" \
-d '{
"tts": { "provider": "elevenLabs", "voiceId": "..." },
"stt": { "provider": "deepgram", "model": "nova-3-general" }
}'
curl -X POST https://api.agntix.ai/v1/chat/voice/token \
-H "x-api-key: $AGNTIX_API_KEY" \
-H "Content-Type: application/json" \
-d '{ "agentId": "agnt_…", "userId": "browser-anon-id" }'
```
The token in the response is what you hand to the [LiveKit Web SDK](https://docs.livekit.io/reference/client-sdk-js/) to join the room. See the [Voice API reference](/api-reference/voice/overview) for the full schema.