> ## Documentation Index
> Fetch the complete documentation index at: https://docs.agntix.ai/llms.txt
> Use this file to discover all available pages before exploring further.
# Tools
> Let an agent call your APIs or built-in functions during a conversation — configure everything from the dashboard.
A **tool** is something the agent can invoke mid-conversation: query your CRM, schedule a meeting, end a phone call, transfer to a human, or post to Slack. Agntix supports two types:
| Type | What it is |
| ----------------- | ------------------------------------------------------------------------------------------------------------------------------ |
| **API Tool** | An HTTP endpoint Agntix calls on the agent's behalf. You define URL, method, headers, query/body schema. |
| **Function Tool** | A built-in capability — `endPhoneCall`, `transferPhoneCall`, `detectVoicemail`, and similar — that runs in our infrastructure. |
This guide walks you through creating an API tool, attaching it to an agent, and testing the round-trip — all from the dashboard.
## Prerequisites
* A signed-in dashboard account at [app.agntix.ai](https://app.agntix.ai).
* An existing agent (see [Build your first agent](/guides/build-your-first-agent)).
* For API tools: a reachable HTTPS endpoint you want the agent to call. The endpoint should respond in **\< 1 second** for voice agents to stay snappy.
## Step 1: Open the Tools page
From the left navigation, click **Tools**. New organizations start with an empty list.
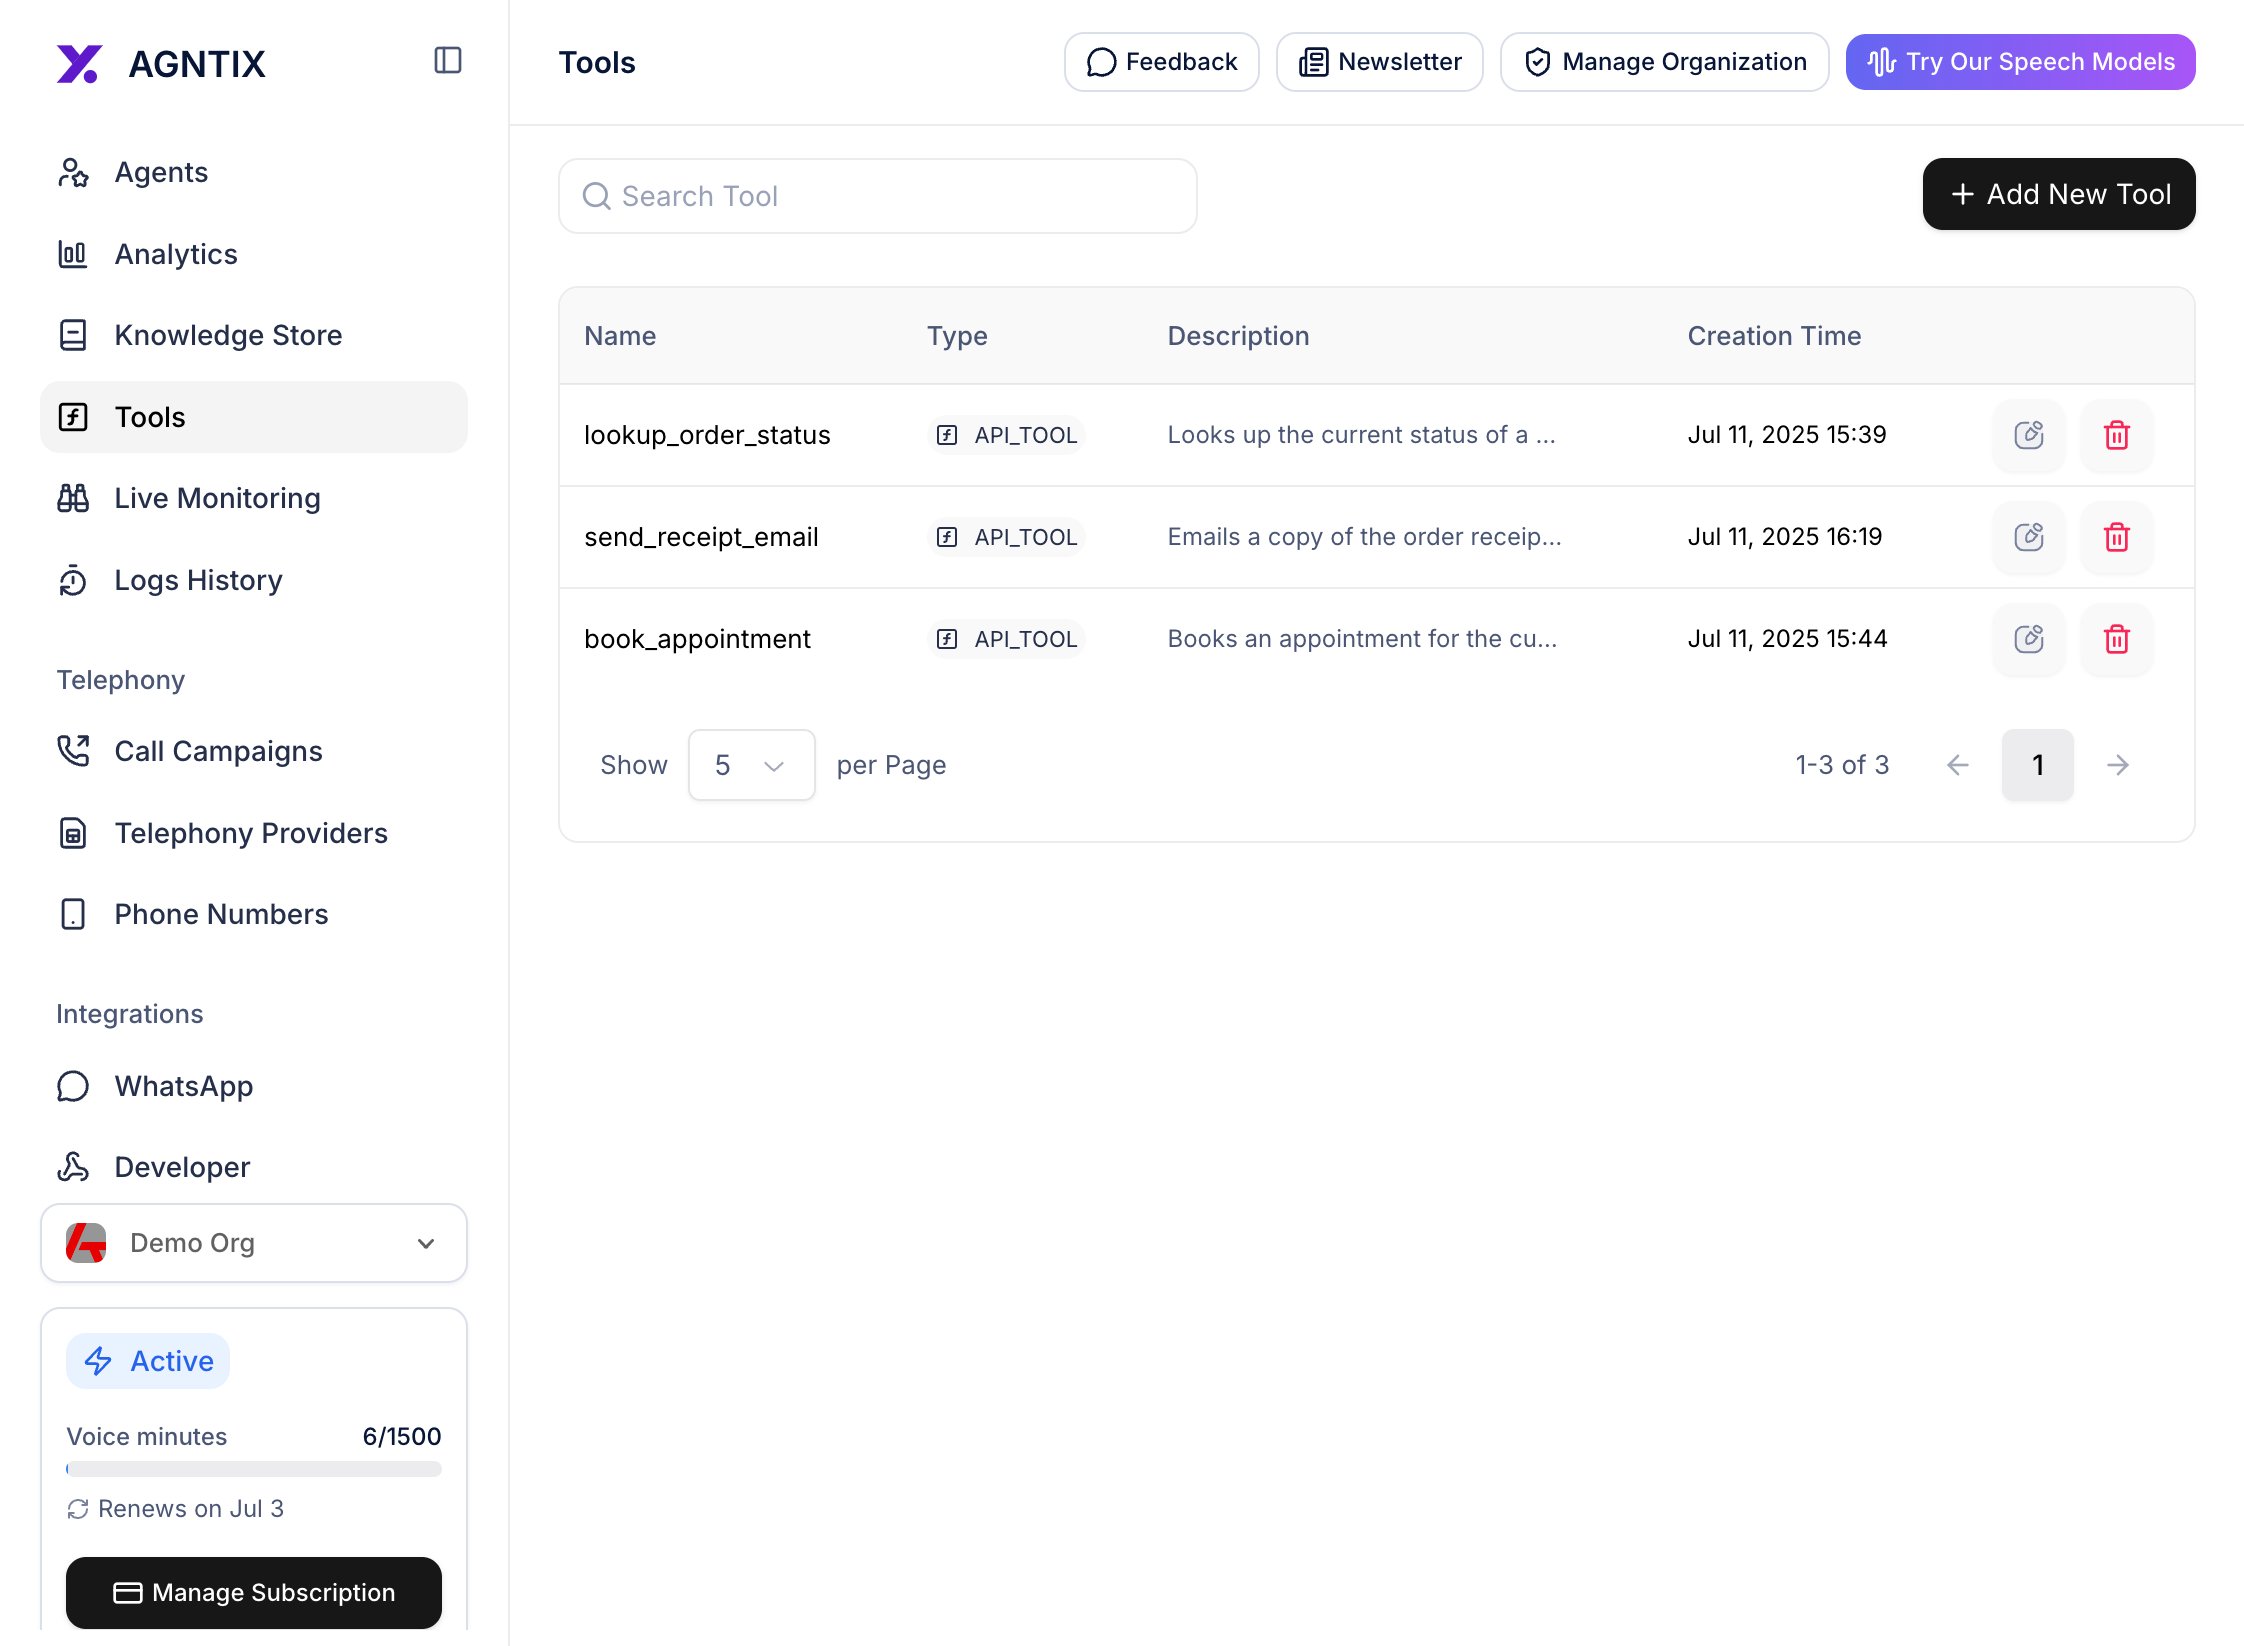 Click **+ Create Tool**.
## Step 2: Fill in the basics
The Create Tool modal collects:
1. **Name** — 8–20 chars, lowercase letters, digits, and underscores only (e.g. `lookup_order_status`). The LLM sees this name verbatim — make it self-describing.
2. **Description** — what the tool does. **The LLM uses this to decide when to call it** — be precise. Bad: *"queries orders"*. Good: *"Looks up the current status of a customer order by its order number. Returns status, expected delivery date, and shipping carrier."*
3. **Type** — leave on **API Tool** for this guide.
Click **+ Create Tool**.
## Step 2: Fill in the basics
The Create Tool modal collects:
1. **Name** — 8–20 chars, lowercase letters, digits, and underscores only (e.g. `lookup_order_status`). The LLM sees this name verbatim — make it self-describing.
2. **Description** — what the tool does. **The LLM uses this to decide when to call it** — be precise. Bad: *"queries orders"*. Good: *"Looks up the current status of a customer order by its order number. Returns status, expected delivery date, and shipping carrier."*
3. **Type** — leave on **API Tool** for this guide.
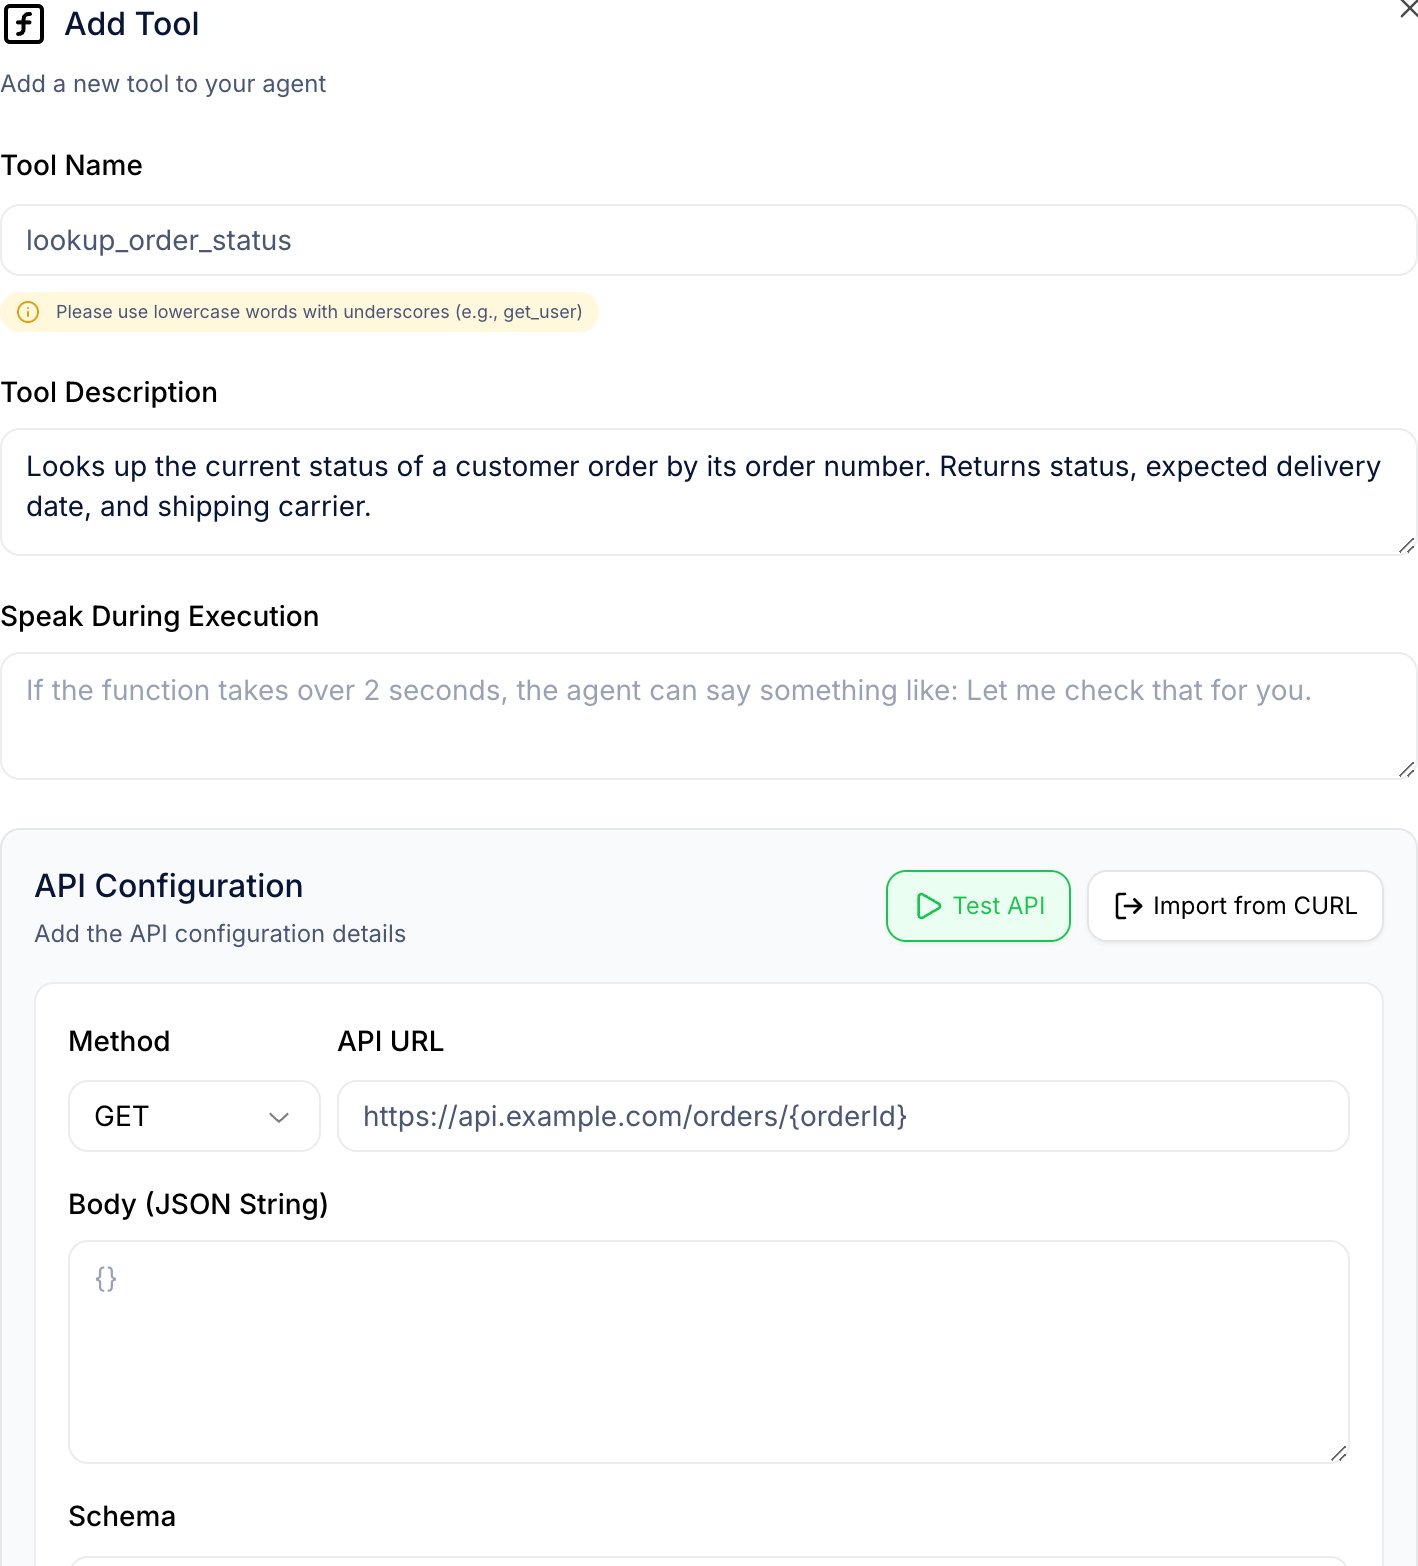 ## Step 3: Configure the HTTP request
Below the basics you'll see the request configuration:
* **URL** — full HTTPS URL. May contain `{placeholders}` that Agntix fills from the schema you define in Step 4 (e.g. `https://api.example.com/orders/{orderId}`).
* **Method** — `GET`, `POST`, `PUT`, `PATCH`, `DELETE`.
* **Body** — JSON template (for non-GET methods). Placeholders work here too.
* **Headers** — key/value pairs. Common pattern: `Authorization: Bearer {YOUR_TOKEN}`.
* **Query Params** — key/value pairs appended to the URL.
## Step 3: Configure the HTTP request
Below the basics you'll see the request configuration:
* **URL** — full HTTPS URL. May contain `{placeholders}` that Agntix fills from the schema you define in Step 4 (e.g. `https://api.example.com/orders/{orderId}`).
* **Method** — `GET`, `POST`, `PUT`, `PATCH`, `DELETE`.
* **Body** — JSON template (for non-GET methods). Placeholders work here too.
* **Headers** — key/value pairs. Common pattern: `Authorization: Bearer {YOUR_TOKEN}`.
* **Query Params** — key/value pairs appended to the URL.
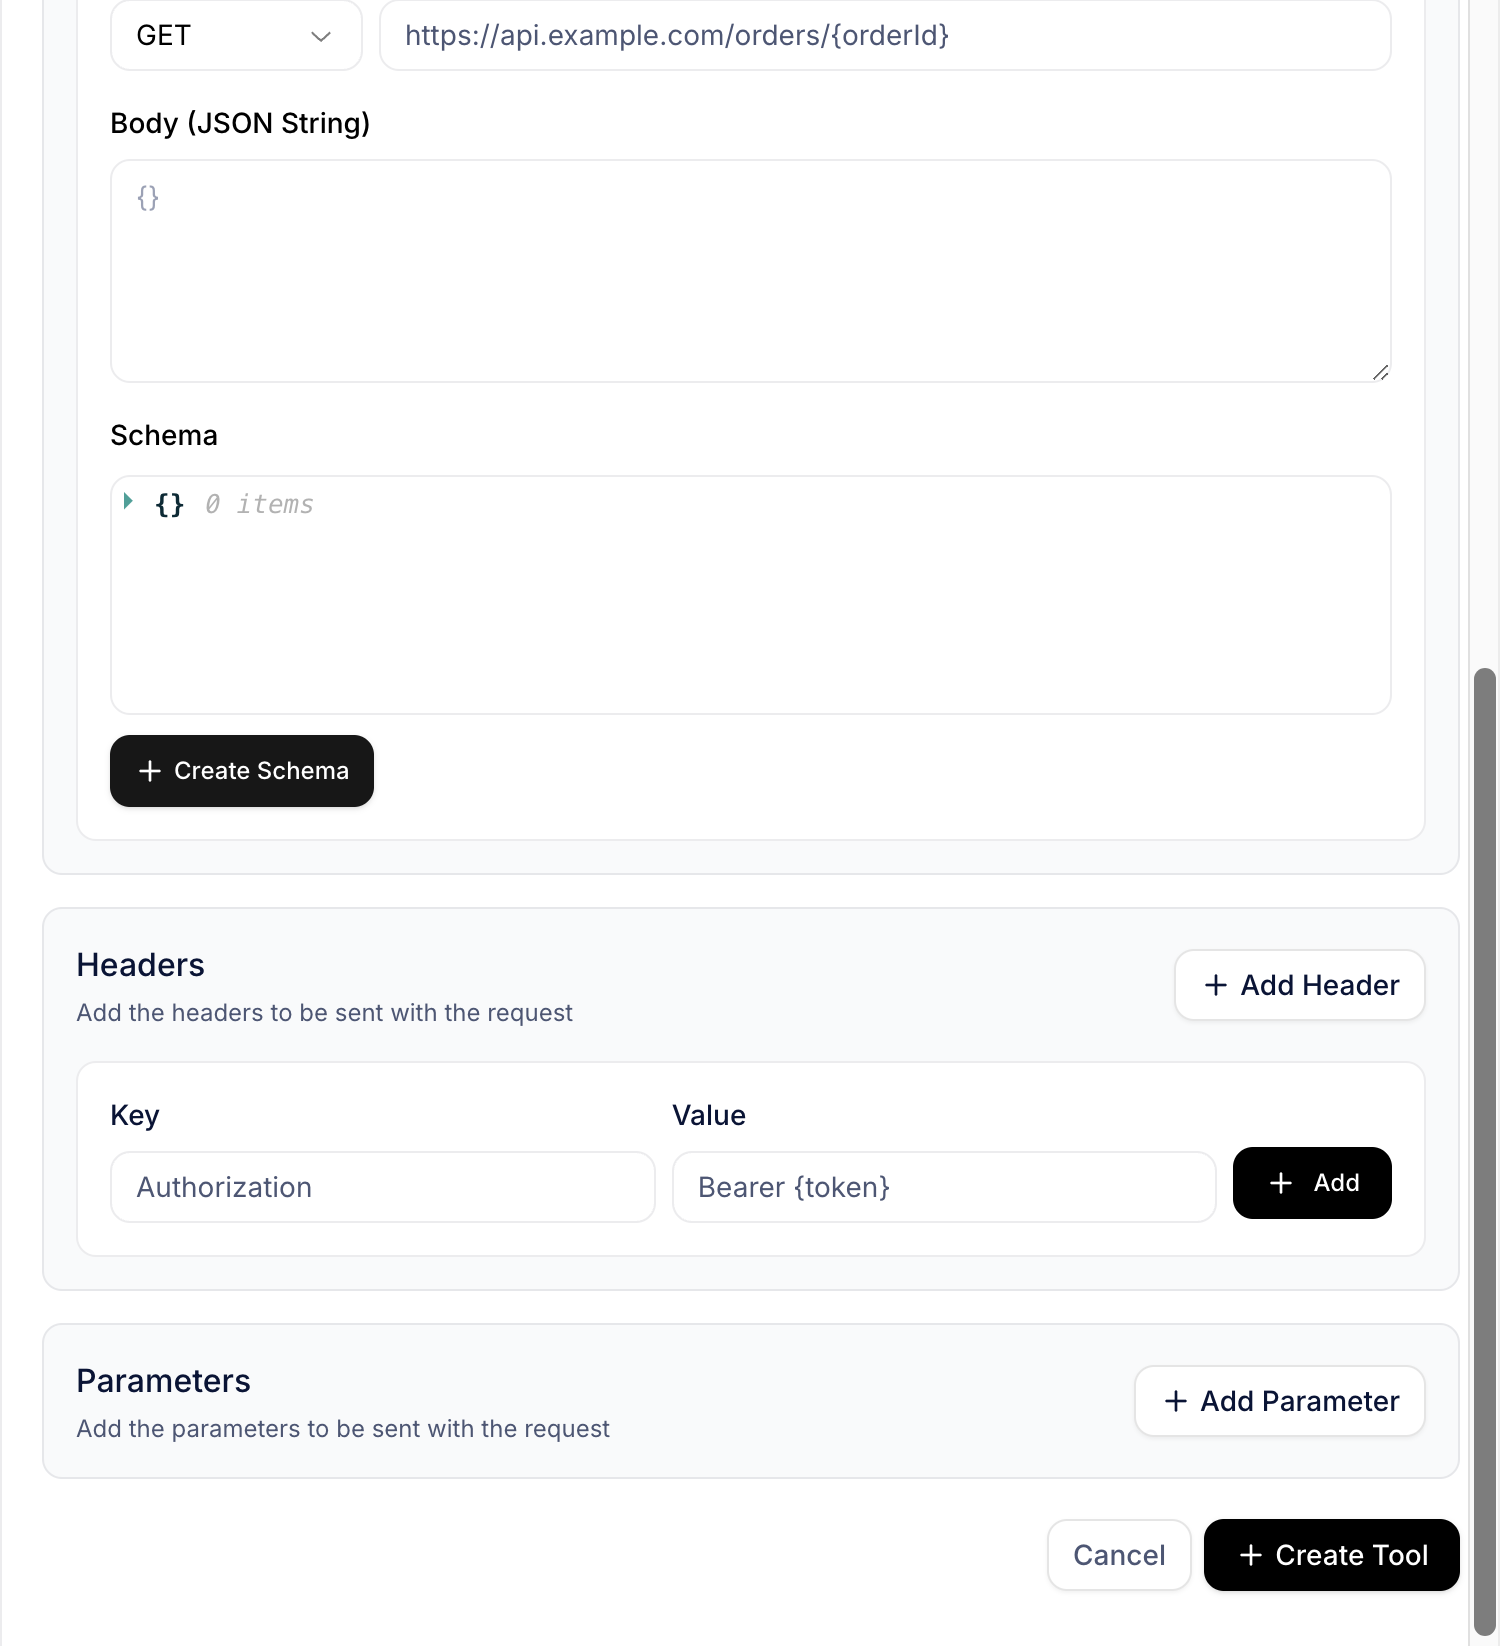 Already have a working `curl` command? Click the **Import from curl** button at the top of the modal — Agntix parses it and fills URL, method, headers, body, and params for you.
## Step 4: Define the input schema
The LLM needs to know which arguments to pass when calling the tool. Click **Schema Builder** to open the visual editor, or paste a JSON Schema directly.
For the order-status example:
```json theme={null}
{
"type": "object",
"properties": {
"orderId": {
"type": "string",
"description": "The order number to look up, e.g. 'ORD-1234'."
}
},
"required": ["orderId"]
}
```
Already have a working `curl` command? Click the **Import from curl** button at the top of the modal — Agntix parses it and fills URL, method, headers, body, and params for you.
## Step 4: Define the input schema
The LLM needs to know which arguments to pass when calling the tool. Click **Schema Builder** to open the visual editor, or paste a JSON Schema directly.
For the order-status example:
```json theme={null}
{
"type": "object",
"properties": {
"orderId": {
"type": "string",
"description": "The order number to look up, e.g. 'ORD-1234'."
}
},
"required": ["orderId"]
}
```
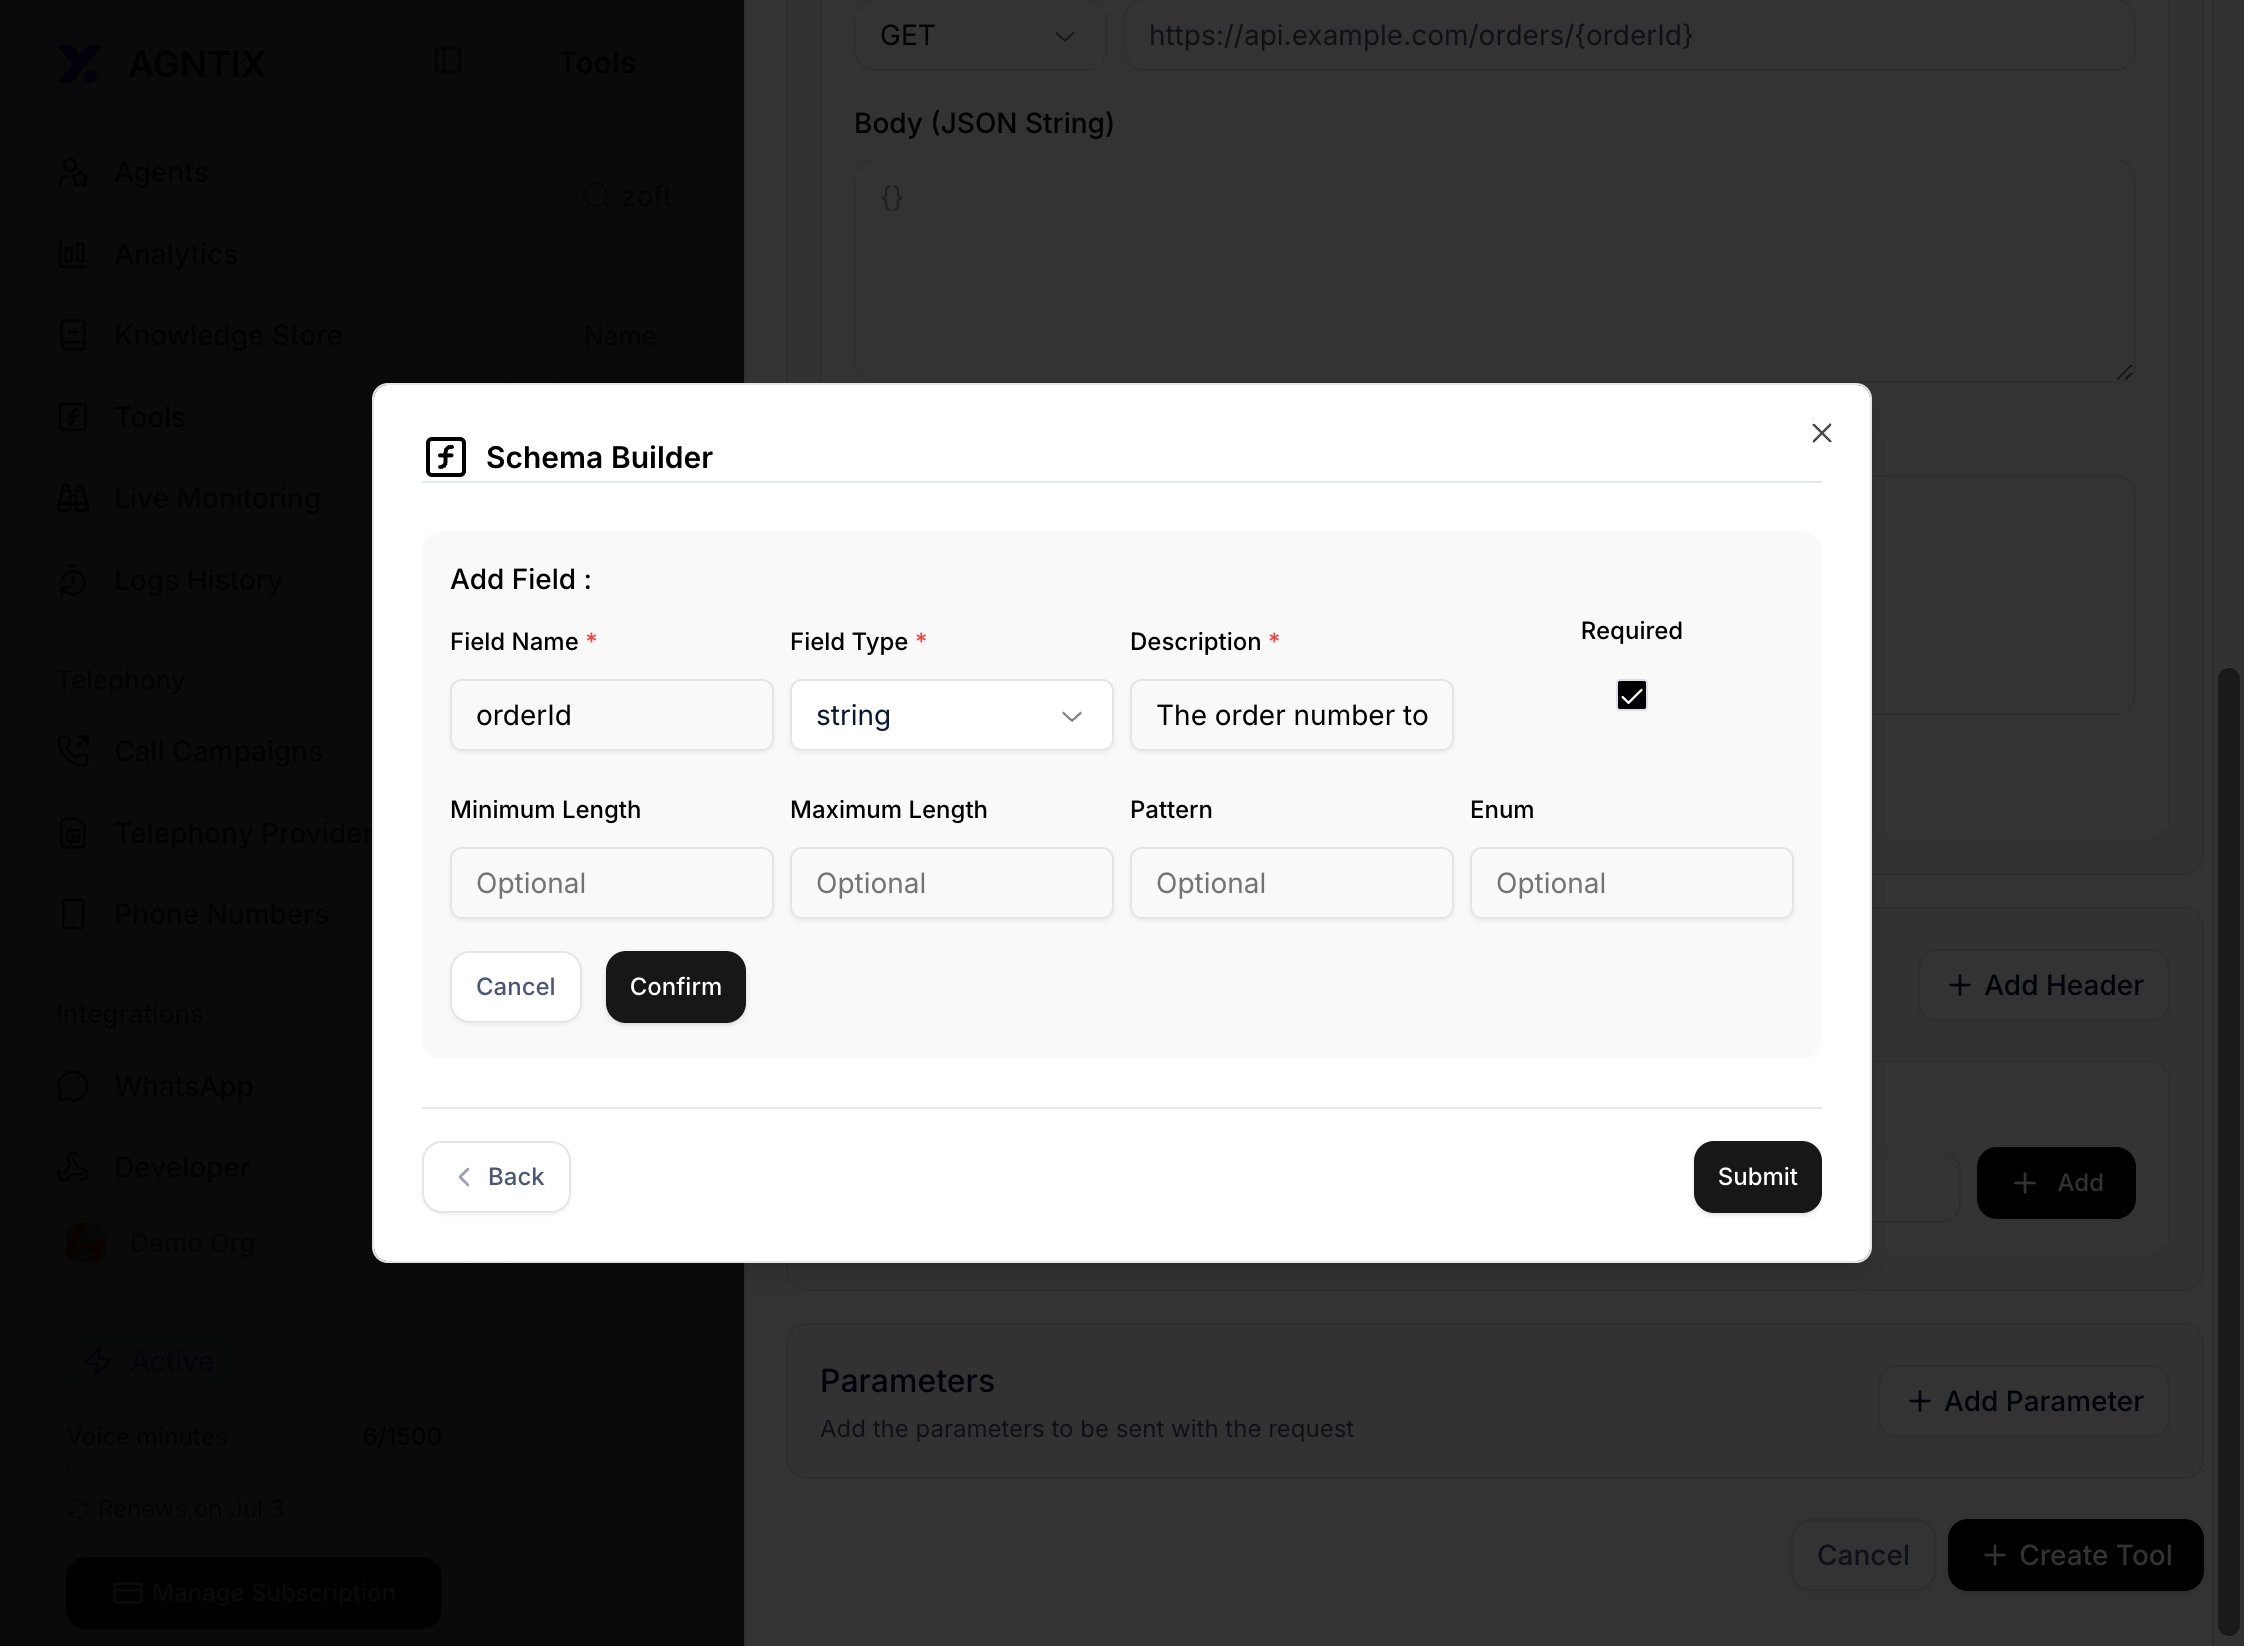 Click **Save** to return to the tool modal. Your placeholders (`{orderId}` in the URL) now map to schema properties.
## Step 5: Test the API
Before saving, click **Test API** in the modal. A side sheet opens where you can fill in sample values for each schema property and fire a real request against your endpoint.
Click **Save** to return to the tool modal. Your placeholders (`{orderId}` in the URL) now map to schema properties.
## Step 5: Test the API
Before saving, click **Test API** in the modal. A side sheet opens where you can fill in sample values for each schema property and fire a real request against your endpoint.
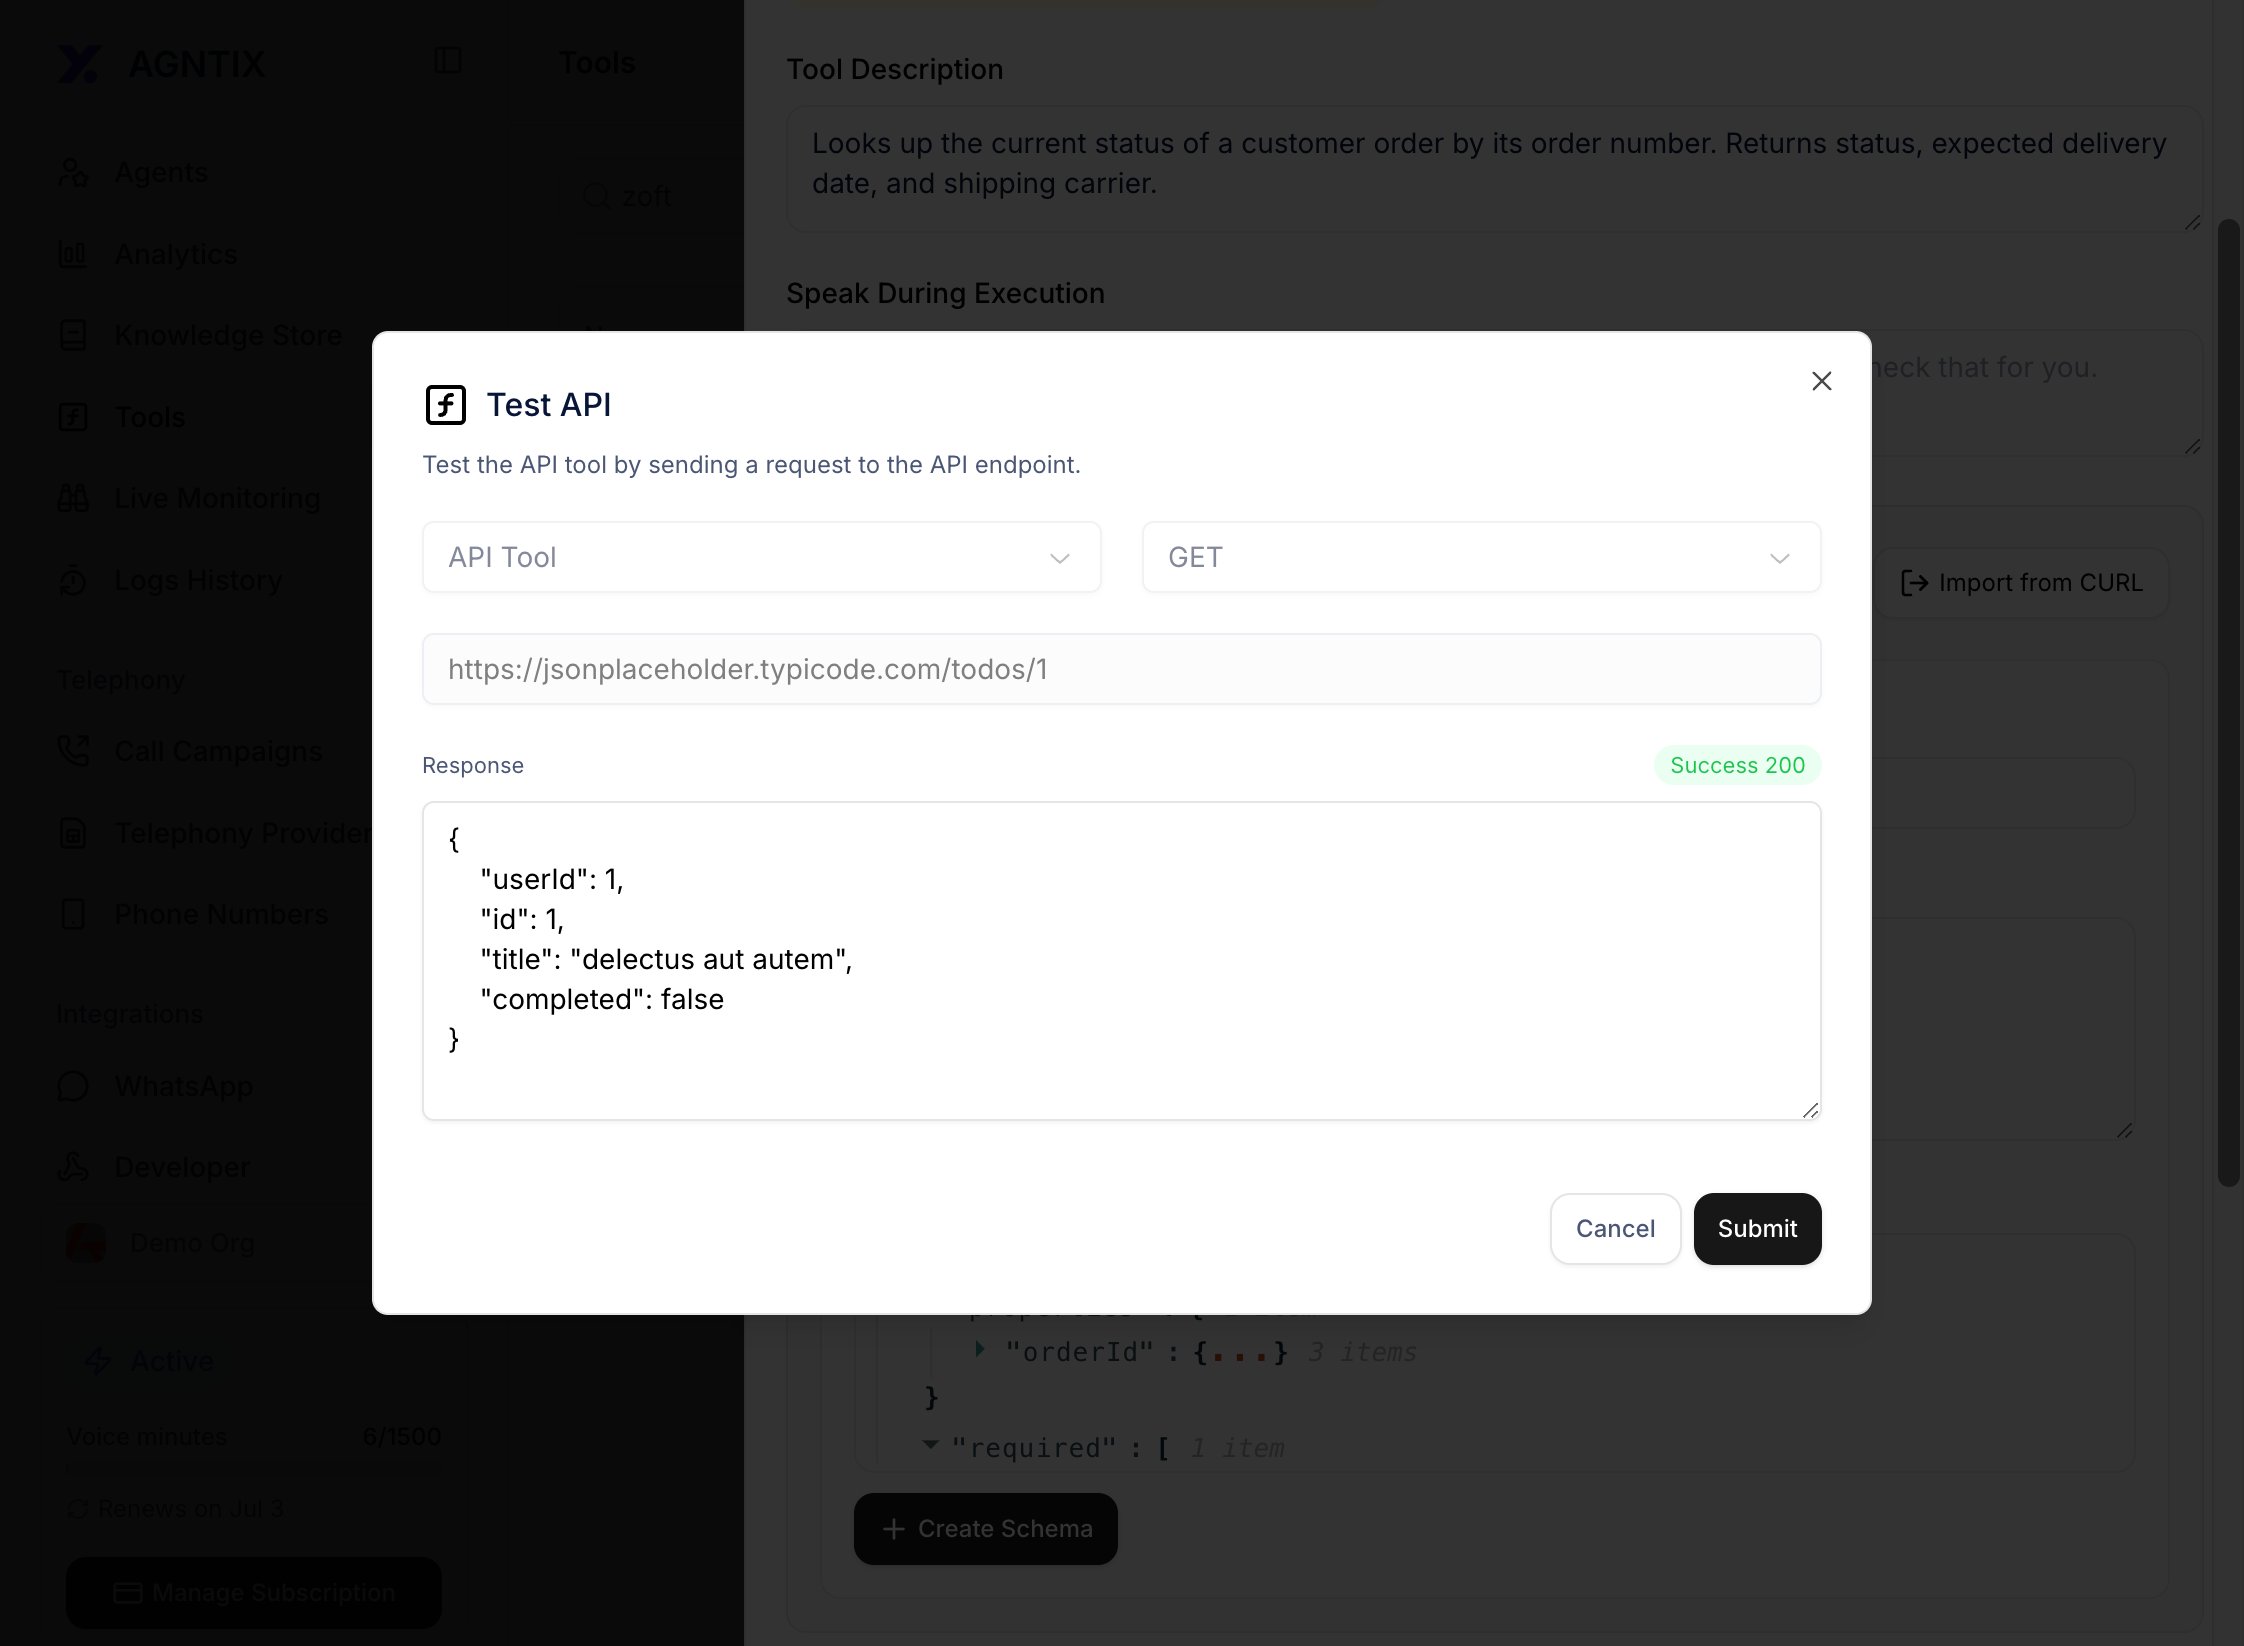 Tweak headers / URL / schema until you get a 2xx response. **Tool calls share the voice/chat latency budget — anything slower than \~1 s will noticeably hurt voice UX.**
Close the side sheet and click **Create Tool** in the main modal.
## Step 6: Attach the tool to an agent
Open your agent at `/agents/{id}`. Switch to the **Functions** tab on the right side.
The tab shows two groups:
* **Built-in functions** — toggle on for *End Call*, *Transfer Call*, *Voicemail detection*. These are pre-configured; you only pick when they fire.
* **Custom Tools** — click **+ Add** to attach your newly-created tool. You can attach multiple.
Tweak headers / URL / schema until you get a 2xx response. **Tool calls share the voice/chat latency budget — anything slower than \~1 s will noticeably hurt voice UX.**
Close the side sheet and click **Create Tool** in the main modal.
## Step 6: Attach the tool to an agent
Open your agent at `/agents/{id}`. Switch to the **Functions** tab on the right side.
The tab shows two groups:
* **Built-in functions** — toggle on for *End Call*, *Transfer Call*, *Voicemail detection*. These are pre-configured; you only pick when they fire.
* **Custom Tools** — click **+ Add** to attach your newly-created tool. You can attach multiple.
 Click **Save Changes** in the page header.
## Step 7: Verify the tool fires
Click **Test Agent** in the page header. Send a message that should obviously trigger the tool — for the order-status example:
> "What's the status of order ORD-1234?"
In the test panel you'll see three things in sequence:
1. The user message you sent.
2. A **tool call** entry — `lookup_order_status` invoked with `{"orderId": "ORD-1234"}`.
3. The assistant's final reply, incorporating the tool's response.
Click **Save Changes** in the page header.
## Step 7: Verify the tool fires
Click **Test Agent** in the page header. Send a message that should obviously trigger the tool — for the order-status example:
> "What's the status of order ORD-1234?"
In the test panel you'll see three things in sequence:
1. The user message you sent.
2. A **tool call** entry — `lookup_order_status` invoked with `{"orderId": "ORD-1234"}`.
3. The assistant's final reply, incorporating the tool's response.
 You can also see this in **Logs / History** for any real session — the tool call shows up as a `TOOL` message with full payload.
## Verify it works
* The tool appears in the `/tools` list with the correct name and type.
* The agent's **Functions** tab shows the tool selected after saving.
* A test message that should trigger the tool actually fires the HTTP request (check your server logs).
* The agent's final reply uses information from the tool's response.
## Troubleshooting
| Symptom | Likely cause | Fix |
| ----------------------------------- | --------------------------------- | ---------------------------------------------------------------------------------------------- |
| Tool never fires | Description too vague | Rewrite the **Description** to explicitly say *when* the tool should be used; restate examples |
| Tool fires too often | Description too aggressive | Soften the description: *"Use only when the user provides an order number."* |
| 401/403 from your API | Header placeholder not filled | Double-check the **Headers** section; ensure no literal `{YOUR_TOKEN}` text |
| Voice latency spike when tool fires | Slow endpoint | Cache server-side; aim for \< 500 ms p95 |
| Agent invents tool arguments | Required fields missing in schema | Mark fields `required` in the JSON Schema |
## Function tools
For **end call** / **transfer call** / **voicemail detection**, you don't need to build an API. Open the agent's **Functions** tab and toggle the built-in function on — Agntix handles the implementation. Configure conditions (e.g. transfer destination phone number) in the same panel.
## API alternative
Same flow over HTTP:
```bash theme={null}
curl -X POST https://api.agntix.ai/v1/chat/tools \
-H "x-api-key: $AGNTIX_API_KEY" \
-H "Content-Type: application/json" \
-d '{
"name": "lookup_order_status",
"description": "Look up the current status of an order by its number.",
"type": "API",
"apiTool": {
"url": "https://api.example.com/orders/{orderId}",
"method": "GET",
"headers": { "Authorization": "Bearer $YOUR_API_TOKEN" }
},
"ajvPropertiesSchema": {
"type": "object",
"properties": { "orderId": { "type": "string" } },
"required": ["orderId"]
}
}'
curl -X PATCH https://api.agntix.ai/v1/chat/agents/$AGENT_ID \
-H "x-api-key: $AGNTIX_API_KEY" \
-H "Content-Type: application/json" \
-d '{ "config": { "toolsEnabled": true, "toolIds": ["tool_…"] } }'
```
See the [Tools API reference](/api-reference/tools/overview) for the full schema.
## Common next steps
Watch tool calls live from your backend.
Tools work the same way over voice — with tighter latency budgets.
Get notified server-side when a tool fires.
Pair tools with RAG for the strongest agents.
You can also see this in **Logs / History** for any real session — the tool call shows up as a `TOOL` message with full payload.
## Verify it works
* The tool appears in the `/tools` list with the correct name and type.
* The agent's **Functions** tab shows the tool selected after saving.
* A test message that should trigger the tool actually fires the HTTP request (check your server logs).
* The agent's final reply uses information from the tool's response.
## Troubleshooting
| Symptom | Likely cause | Fix |
| ----------------------------------- | --------------------------------- | ---------------------------------------------------------------------------------------------- |
| Tool never fires | Description too vague | Rewrite the **Description** to explicitly say *when* the tool should be used; restate examples |
| Tool fires too often | Description too aggressive | Soften the description: *"Use only when the user provides an order number."* |
| 401/403 from your API | Header placeholder not filled | Double-check the **Headers** section; ensure no literal `{YOUR_TOKEN}` text |
| Voice latency spike when tool fires | Slow endpoint | Cache server-side; aim for \< 500 ms p95 |
| Agent invents tool arguments | Required fields missing in schema | Mark fields `required` in the JSON Schema |
## Function tools
For **end call** / **transfer call** / **voicemail detection**, you don't need to build an API. Open the agent's **Functions** tab and toggle the built-in function on — Agntix handles the implementation. Configure conditions (e.g. transfer destination phone number) in the same panel.
## API alternative
Same flow over HTTP:
```bash theme={null}
curl -X POST https://api.agntix.ai/v1/chat/tools \
-H "x-api-key: $AGNTIX_API_KEY" \
-H "Content-Type: application/json" \
-d '{
"name": "lookup_order_status",
"description": "Look up the current status of an order by its number.",
"type": "API",
"apiTool": {
"url": "https://api.example.com/orders/{orderId}",
"method": "GET",
"headers": { "Authorization": "Bearer $YOUR_API_TOKEN" }
},
"ajvPropertiesSchema": {
"type": "object",
"properties": { "orderId": { "type": "string" } },
"required": ["orderId"]
}
}'
curl -X PATCH https://api.agntix.ai/v1/chat/agents/$AGENT_ID \
-H "x-api-key: $AGNTIX_API_KEY" \
-H "Content-Type: application/json" \
-d '{ "config": { "toolsEnabled": true, "toolIds": ["tool_…"] } }'
```
See the [Tools API reference](/api-reference/tools/overview) for the full schema.
## Common next steps
Watch tool calls live from your backend.
Tools work the same way over voice — with tighter latency budgets.
Get notified server-side when a tool fires.
Pair tools with RAG for the strongest agents.