> ## Documentation Index
> Fetch the complete documentation index at: https://docs.agntix.ai/llms.txt
> Use this file to discover all available pages before exploring further.
# Build your first agent
> Create, configure, and test an Agntix AI agent from the dashboard in a couple of minutes.
An **agent** in Agntix is a configurable assistant — a model + a system prompt + an optional voice + optional tools. This guide walks you through creating one from the dashboard, configuring it on the agent detail page, and talking to it from the built-in test panel.
## Prerequisites
* A signed-in dashboard account at [app.agntix.ai](https://app.agntix.ai). Sign up takes about 30 seconds; the default plan includes enough free quota to finish this guide.
* Admin role on your organization (Member accounts can view agents but not create them).
## Step 1: Open the Agents page
From the left navigation, click **Agents**. You'll land on `/agents`, which lists every agent in your organization. New organizations start empty.
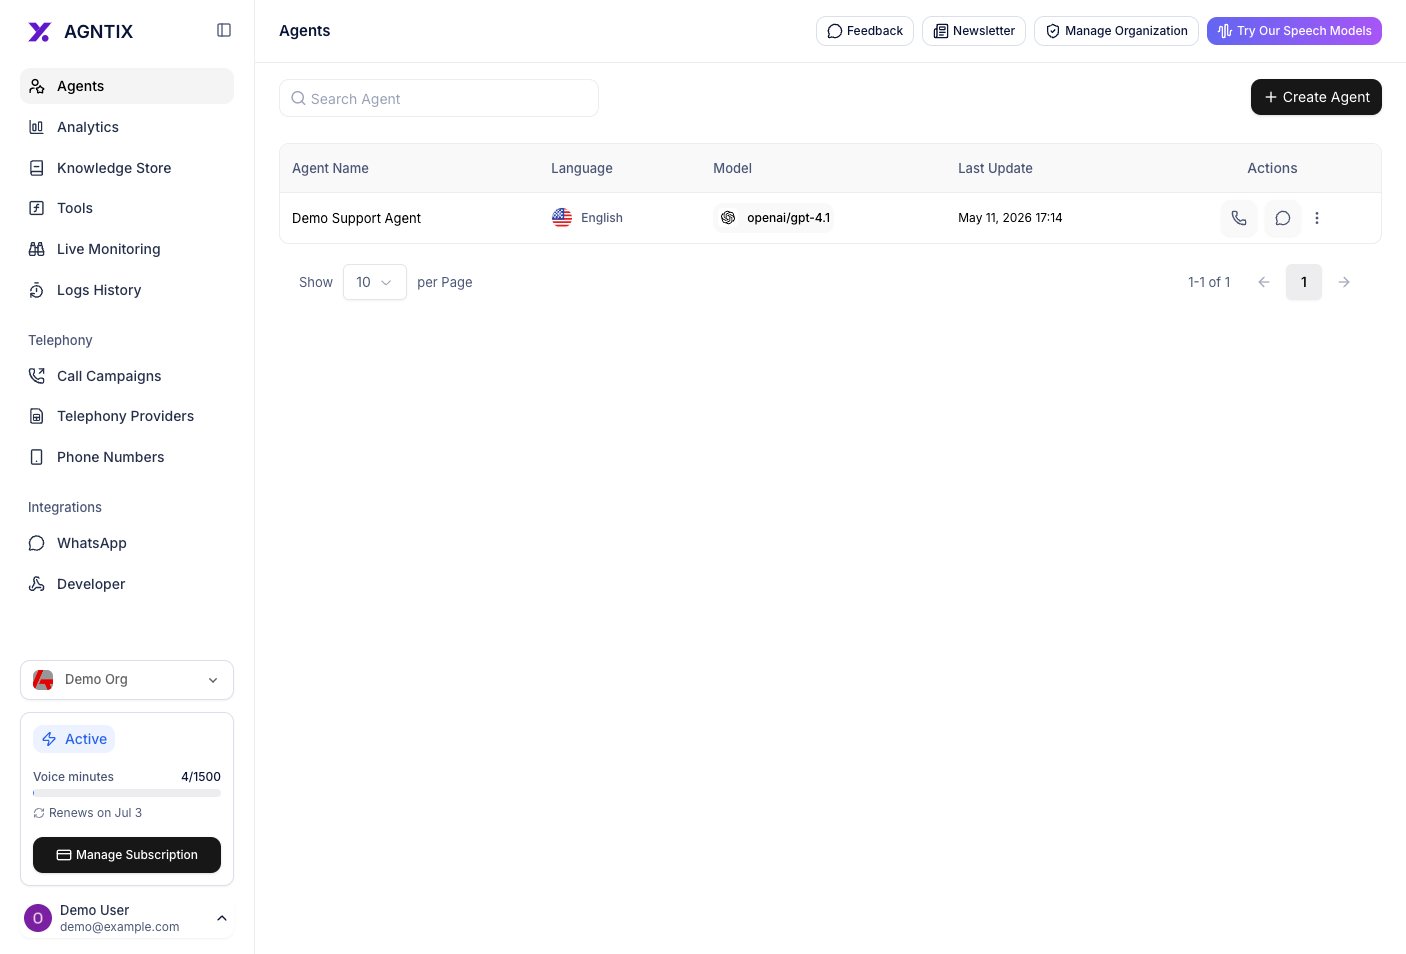 Click **+ Create Agent** to open the create dialog.
## Step 2: Create the agent
The **Create New Agent** dialog asks for just three things — everything else is configured *after* the agent exists:
1. **Name** — at least 5 characters. Shown in lists, logs, and webhooks.
2. **Language** — the agent's primary language. Agntix uses it to pick sensible default text, speech-to-text, and text-to-speech models for you.
3. **Voice Enabled** — on by default. Leave it on if the agent will make/receive phone or browser calls; turn it off for a chat-only agent. You can flip this later — see [Voice calls](/guides/voice-calls).
Click **+ Create Agent** to open the create dialog.
## Step 2: Create the agent
The **Create New Agent** dialog asks for just three things — everything else is configured *after* the agent exists:
1. **Name** — at least 5 characters. Shown in lists, logs, and webhooks.
2. **Language** — the agent's primary language. Agntix uses it to pick sensible default text, speech-to-text, and text-to-speech models for you.
3. **Voice Enabled** — on by default. Leave it on if the agent will make/receive phone or browser calls; turn it off for a chat-only agent. You can flip this later — see [Voice calls](/guides/voice-calls).
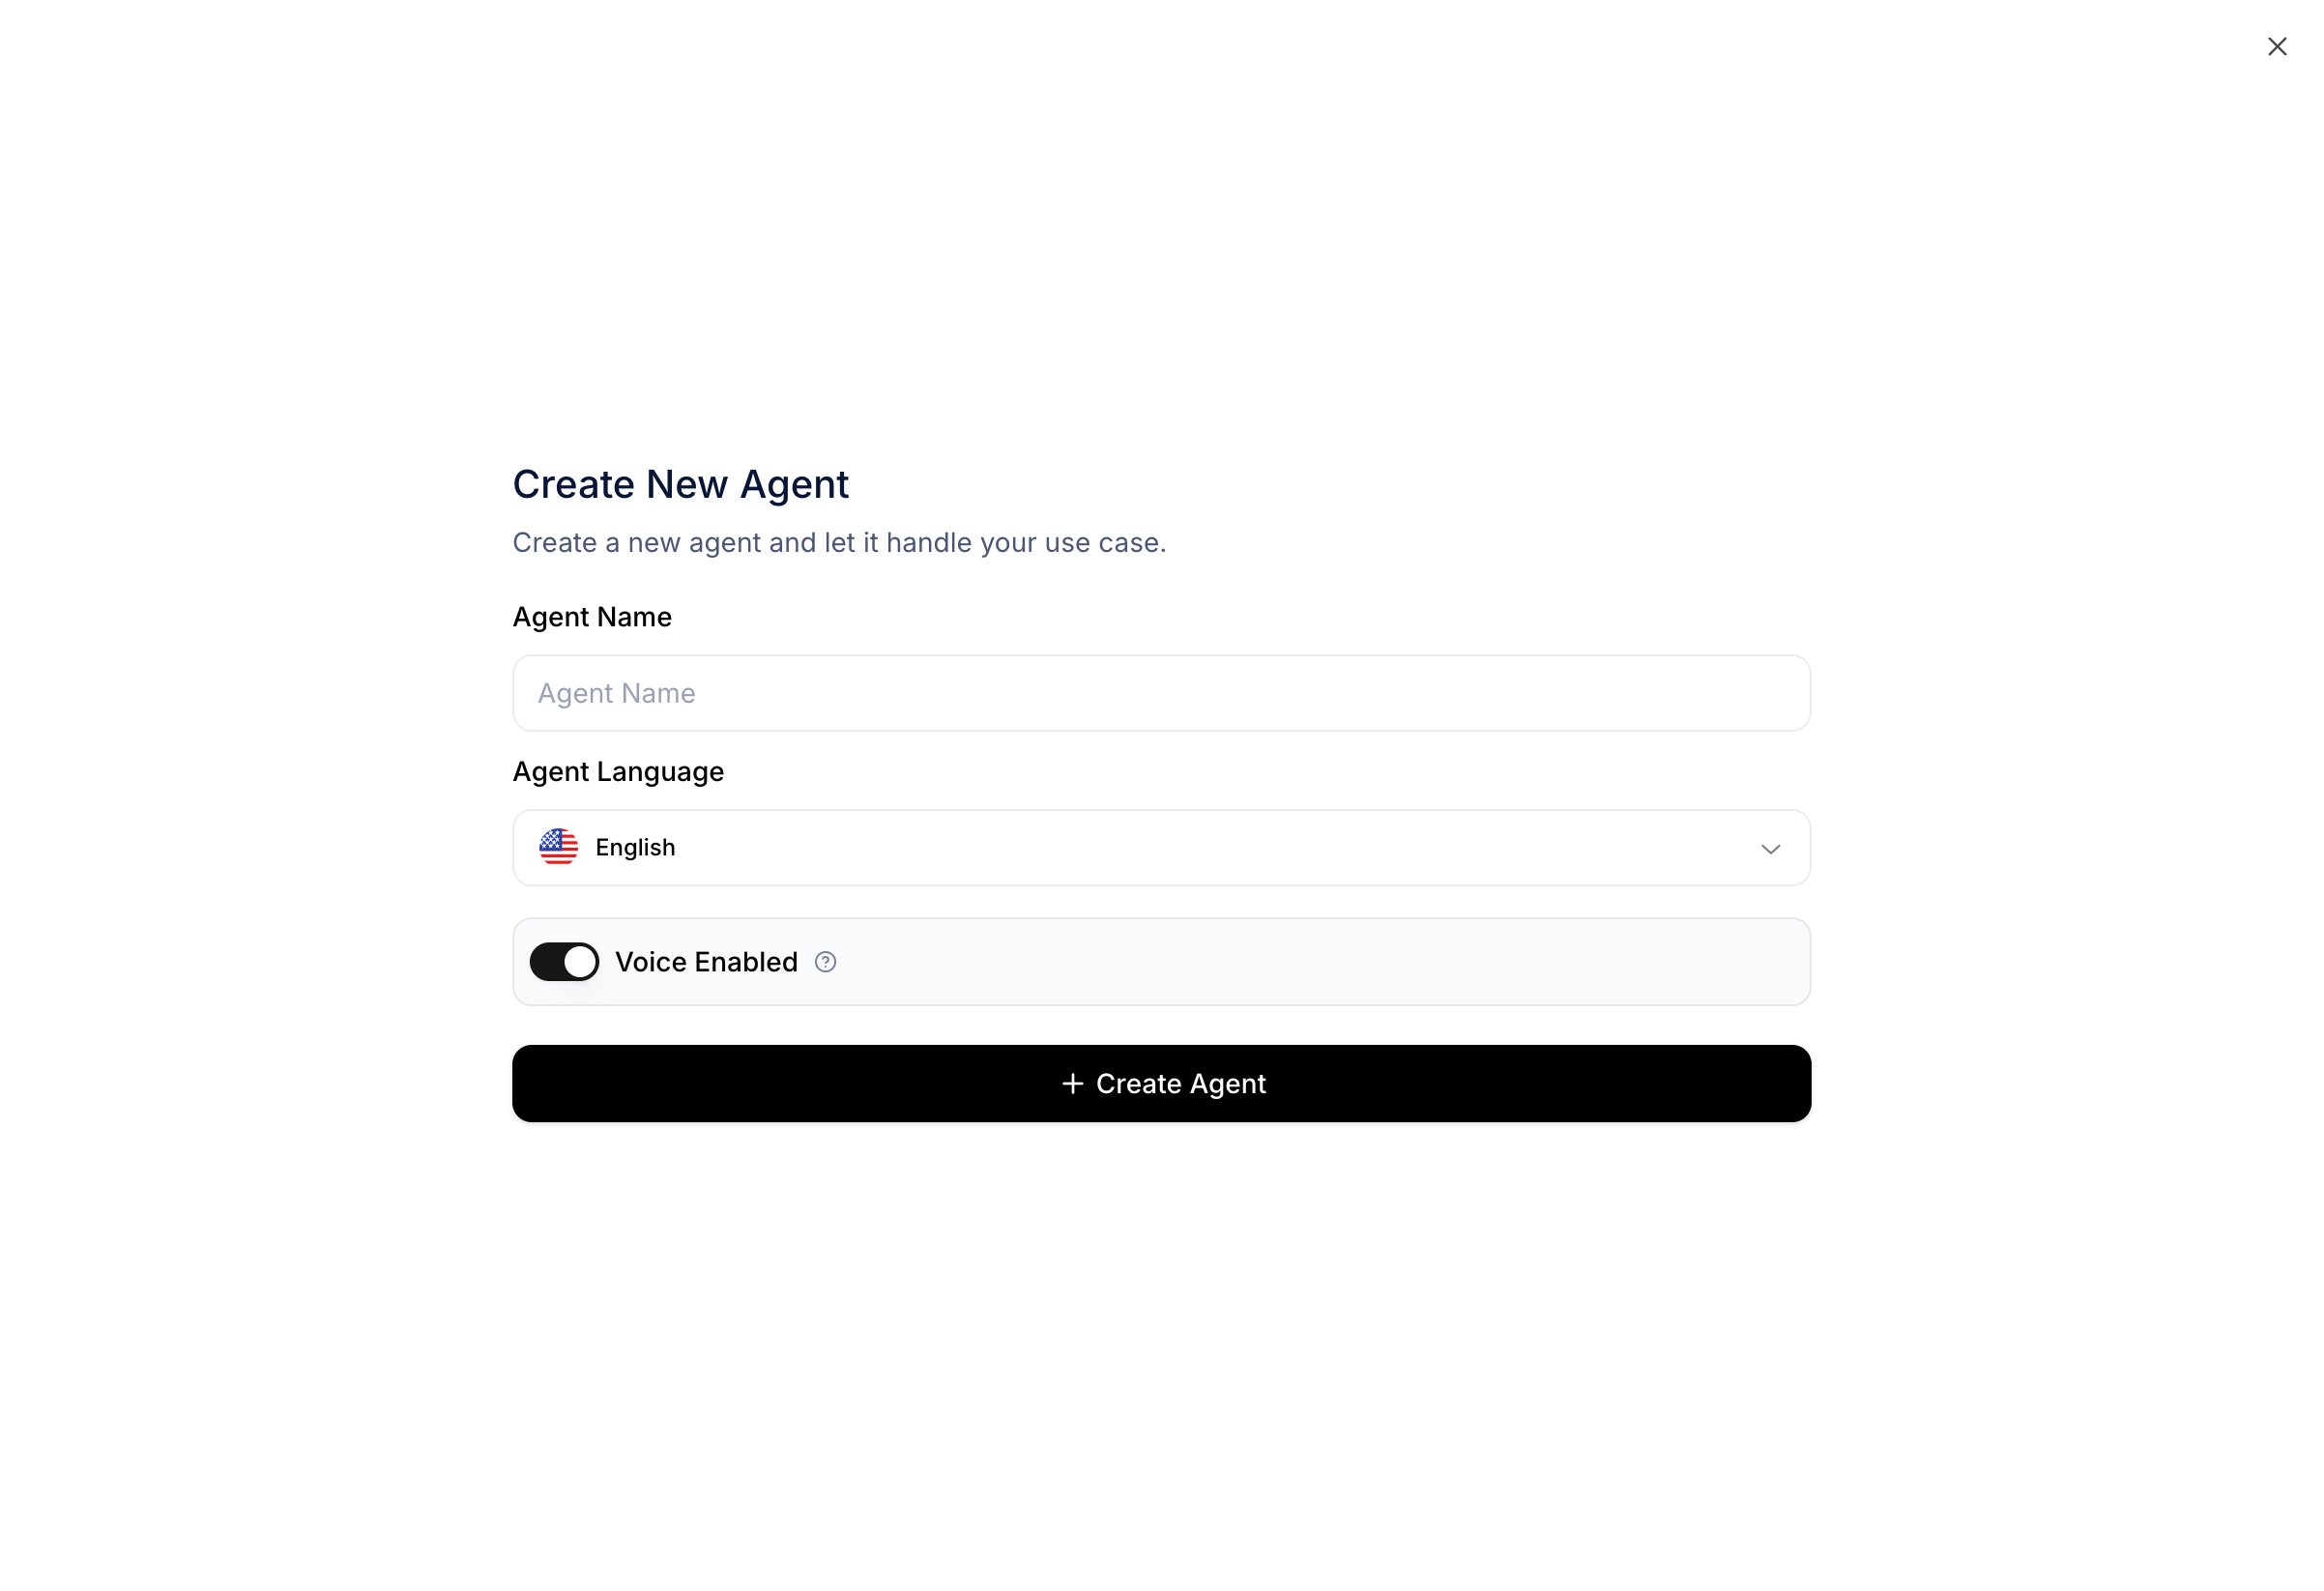 Click **Create Agent**. Agntix creates a blank agent — with default models for your language and a placeholder system prompt — and redirects you to `/agents/{id}`, the agent detail / edit page.
Creation is a single step today — there's no multi-step template wizard. The system prompt, tools, and other settings are all configured on the detail page once the agent exists (next step).
## Step 3: Configure the agent
The detail page has two columns:
* **Left** — the **System Prompt**, model, and language. A new agent starts with a placeholder prompt (*"This is a blank template, update the system prompt to fit your needs"*) — replace it with your own. Use the expand icon at the top-right of the textarea for a full-screen editor on longer prompts.
* **Right** — tabs for **Calls**, **Chat**, **Behavior**, **Functions**, **Multi-agents**, **Analytics**, and **Widgets**. Each tab configures one slice of the agent.
A good starter system prompt for an order-status example:
```text theme={null}
You help customers track their orders. Be concise and friendly.
- Ask for the order number if the user doesn't provide one.
- Never invent order status. If you don't have data, say so.
- If the user asks anything unrelated to orders, politely redirect.
```
Click **Create Agent**. Agntix creates a blank agent — with default models for your language and a placeholder system prompt — and redirects you to `/agents/{id}`, the agent detail / edit page.
Creation is a single step today — there's no multi-step template wizard. The system prompt, tools, and other settings are all configured on the detail page once the agent exists (next step).
## Step 3: Configure the agent
The detail page has two columns:
* **Left** — the **System Prompt**, model, and language. A new agent starts with a placeholder prompt (*"This is a blank template, update the system prompt to fit your needs"*) — replace it with your own. Use the expand icon at the top-right of the textarea for a full-screen editor on longer prompts.
* **Right** — tabs for **Calls**, **Chat**, **Behavior**, **Functions**, **Multi-agents**, **Analytics**, and **Widgets**. Each tab configures one slice of the agent.
A good starter system prompt for an order-status example:
```text theme={null}
You help customers track their orders. Be concise and friendly.
- Ask for the order number if the user doesn't provide one.
- Never invent order status. If you don't have data, say so.
- If the user asks anything unrelated to orders, politely redirect.
```
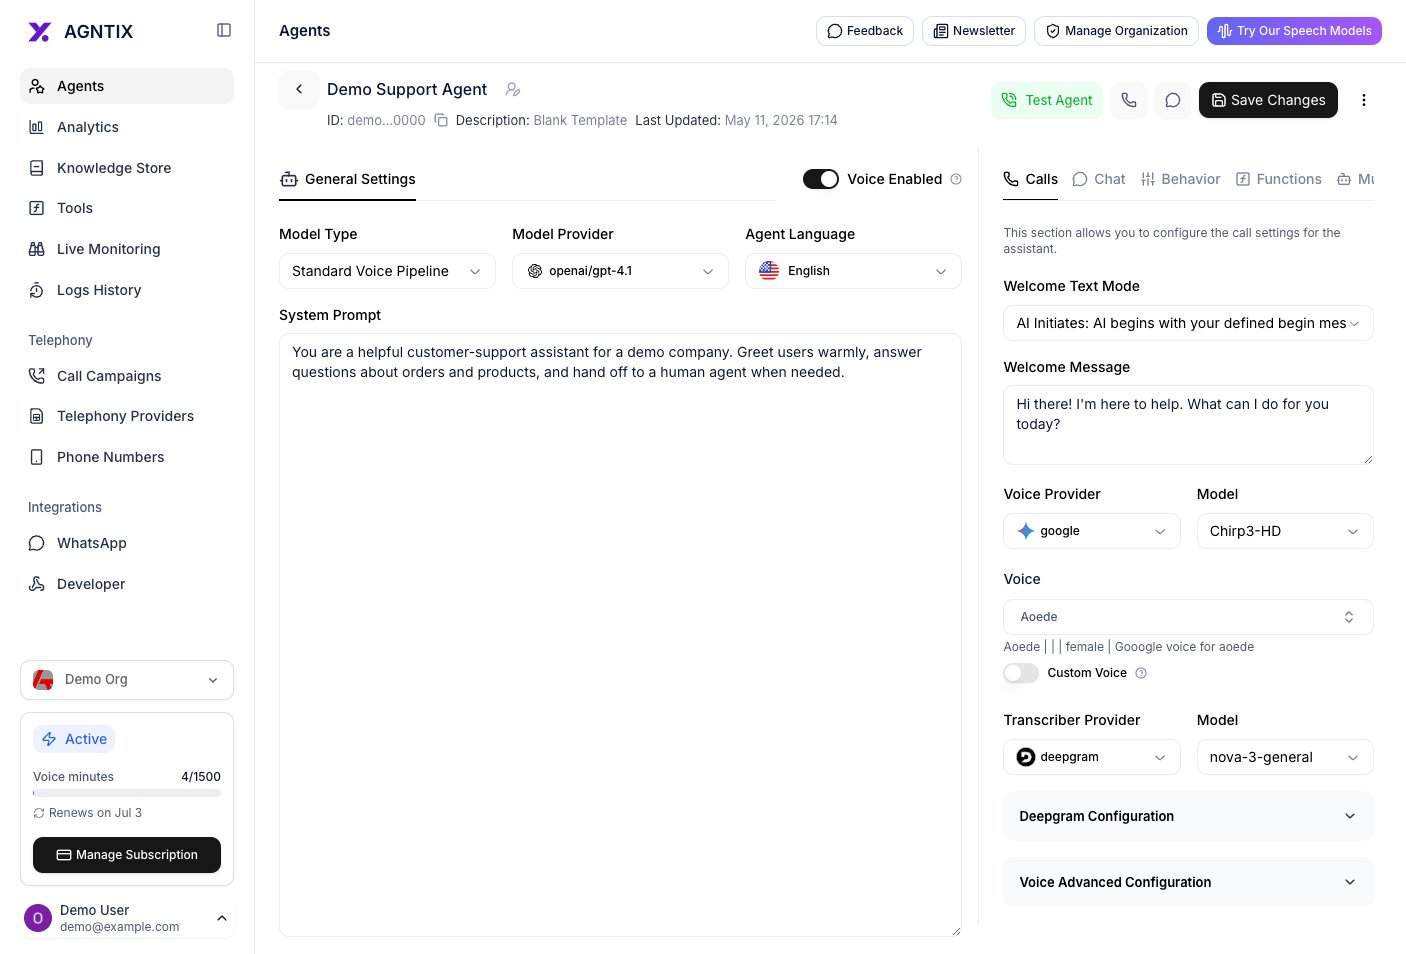 Click **Save Changes** in the top right whenever you edit the prompt or any setting.
## Step 4: Test the agent
In the header you'll see a green **Test Agent** button.
Click **Save Changes** in the top right whenever you edit the prompt or any setting.
## Step 4: Test the agent
In the header you'll see a green **Test Agent** button.
 Click **Test Agent**. A LiveKit voice room or chat panel opens (depending on the **Voice Enabled** toggle). Type or speak a question your prompt should handle — e.g. *"What's the status of my order 1234?"* — and verify the agent stays in character.
If you also want to share the agent without giving testers dashboard access, use the two small icons next to **Test Agent**:
* **Phone icon** — opens the SDK voice demo for this agent.
* **Speech-bubble icon** — opens the SDK chat demo for this agent.
Both URLs are shareable.
## Verify it works
Your agent is wired up if all of the following are true:
* It appears at `/agents` with the correct name and **Updated At** timestamp.
* Clicking **Test Agent** opens a working test panel without errors.
* The agent's replies follow the system prompt you saved (correct persona, refuses out-of-scope questions).
* The **Analytics** tab on the detail page starts collecting session data after your first test.
## Common next steps
Ground the agent's answers in your own documents.
Same agent — now over the browser or PSTN.
Let the agent call your APIs and built-in functions.
Push session lifecycle events to your back-office.
## API alternative
If you'd rather create the agent over HTTP — for CI, scripts, or back-office tooling — you can set the name, model, **and** system prompt in a single call (the API isn't limited to the dashboard's three fields):
```bash theme={null}
curl https://api.agntix.ai/v1/chat/agents \
-H "x-api-key: $AGNTIX_API_KEY" \
-H "Content-Type: application/json" \
-d '{
"name": "Order Status Bot",
"modelId": "gpt-4o-mini",
"systemPrompt": "You help customers track their orders. Be concise and friendly.",
"config": { "temperature": 0.3, "maxOutputTokens": 200 }
}'
```
See the full multi-step API flow (open a session, stream a message, attach a tool) in the [Quickstart](/quickstart) and the [Agents API reference](/api-reference/agents/create).
Click **Test Agent**. A LiveKit voice room or chat panel opens (depending on the **Voice Enabled** toggle). Type or speak a question your prompt should handle — e.g. *"What's the status of my order 1234?"* — and verify the agent stays in character.
If you also want to share the agent without giving testers dashboard access, use the two small icons next to **Test Agent**:
* **Phone icon** — opens the SDK voice demo for this agent.
* **Speech-bubble icon** — opens the SDK chat demo for this agent.
Both URLs are shareable.
## Verify it works
Your agent is wired up if all of the following are true:
* It appears at `/agents` with the correct name and **Updated At** timestamp.
* Clicking **Test Agent** opens a working test panel without errors.
* The agent's replies follow the system prompt you saved (correct persona, refuses out-of-scope questions).
* The **Analytics** tab on the detail page starts collecting session data after your first test.
## Common next steps
Ground the agent's answers in your own documents.
Same agent — now over the browser or PSTN.
Let the agent call your APIs and built-in functions.
Push session lifecycle events to your back-office.
## API alternative
If you'd rather create the agent over HTTP — for CI, scripts, or back-office tooling — you can set the name, model, **and** system prompt in a single call (the API isn't limited to the dashboard's three fields):
```bash theme={null}
curl https://api.agntix.ai/v1/chat/agents \
-H "x-api-key: $AGNTIX_API_KEY" \
-H "Content-Type: application/json" \
-d '{
"name": "Order Status Bot",
"modelId": "gpt-4o-mini",
"systemPrompt": "You help customers track their orders. Be concise and friendly.",
"config": { "temperature": 0.3, "maxOutputTokens": 200 }
}'
```
See the full multi-step API flow (open a session, stream a message, attach a tool) in the [Quickstart](/quickstart) and the [Agents API reference](/api-reference/agents/create).